Author Archives: DoorVaani

About DoorVaani

Founder and owner of DoorVaani.com.

How to set auto renewal of inbound channels?

You can set your Inbound Channels to renew automatically month after month and charge the renewal cost to your available account credit. Once set, these auto renewals happen 7 days before the expiry date of your Inbound Channels if sufficient credit to pay for the renewal cost is available in your account credit. On auto renewal you will get an email informing you of the completion with a link to the auto generated invoice. Set your Inbound Channels to auto renew to relieve yourself of manually renewing them. This article explains how to set auto renewal of your Inbound Channels.

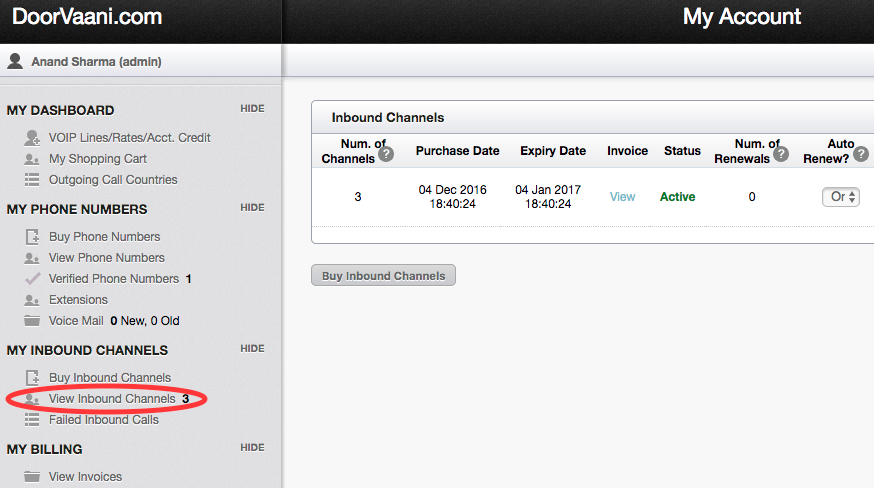
Please log in into your DoorVaani account, if not already logged in, and then click on the “View Inbound Channels” menu under “MY INBOUND CHANNELS” on the left hand side. Please see the below image.

ViewInboundChannelsMenu

View Inbound Channels Menu

In “View Inbound Channels” page, please see the “Auto Renew?” column of drop-downs with options to set the Auto Renew to “On” or “Off”. Please select the option “On” and say OK to the confirmation message.

InboundChannelsAutoRenew

Inbound Channels Auto Renew Option

This will set your Inbound Channels to renew automatically provided you have sufficient credit available in your DoorVaani account. Just in case you do not want the auto renewals you can come back to this page at any time and set the Auto Renew to “Off”.

Inbound Channels

Our DID Phone Numbers come with 2 built-in channels and our Toll-free Phone Numbers have 300 built-in channels. What this means is, you can receive 2 simultaneous inbound calls on your DID Phone Number and 300 simultaneous inbound calls on your Toll-free Phone Numbers.

If your simultaneous inbound calls volume is more than what your available channels can handle, then you can buy extra inbound channels from us. These extra inbound channels are shared across all of the Phone Numbers in your DoorVaani account so the extra calls on any of your Phone Numbers will be able to use these channels.

How do I know if I have excessive inbound calls volume?

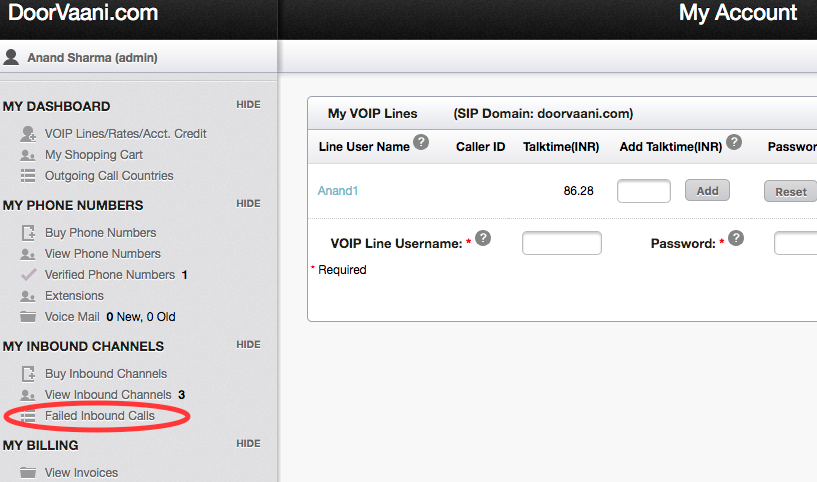
Our system continuously monitors your concurrent inbound calls on each of your Phone Numbers and in case it exceeds your available channels it alerts you via an e-mail. These alerting e-mails go out from our system the very next day and contains full details like which one of your Phone Numbers had those extra inbound calls, the time of the call etc., When you get such an e-mail, you will know that it is time to add some extra Inbound Channels to your account. You can also see the full details of the failed calls that could not be routed to you for want of Inbound Channels in your DoorVaani account. You can access these details including the caller id of the caller from the “Failed Inbound Calls” menu under “MY INBOUND CHANNELS” in the left hand side vertical menu bar. Please see the following screen shot:

FailedInboundCallsMenu

Failed Inbound Calls Menu

How to buy Inbound Channels?

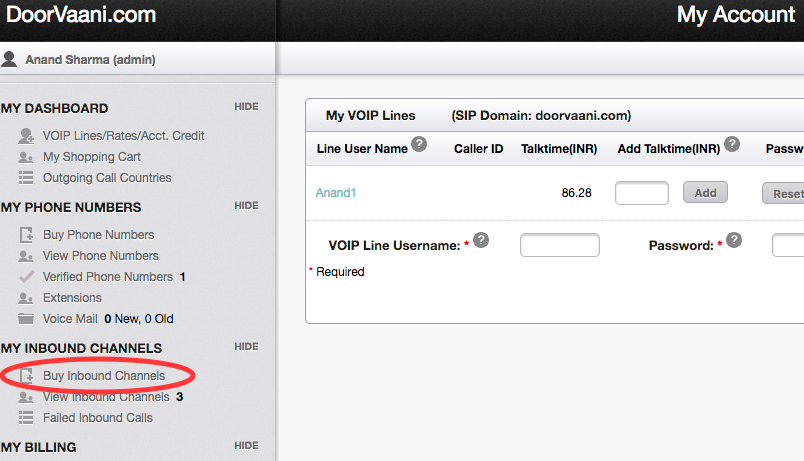
Go to the “Buy Inbound Channels” page using the “Buy Inbound Channels” menu under MY INBOUND CHANNELS from the left hand side vertical menu bar. Please see the following screen shot:

BuyInboundChannelsMenu

Buy Inbound Channels Menu

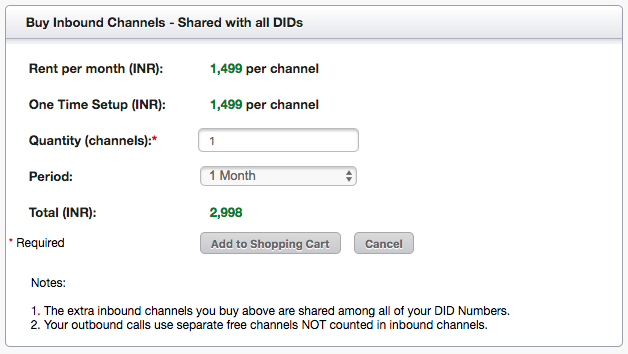
On the “Buy Inbound Channels” page (see below), you can  enter the quantity (Number of channels) you want to buy and then select the period in months and add your order to the shopping cart. Once the order is in shopping cart you can checkout your shopping cart. Your purchases are immediately delivered to your account as soon as you make the payment.

BuyInboundChannelsPage

Buy Inbound Channels Page

Short Extension Numbers

You can assign short easy to use 2 digit, 3 digit or 4 digit unique extension numbers to each one of your VOIP Lines in your DoorVaani account. You can call other VOIP Line users in your DoorVaani account by simply dialing their short extension number. You can also call your own extension number to easily reach your Voice Mail box.

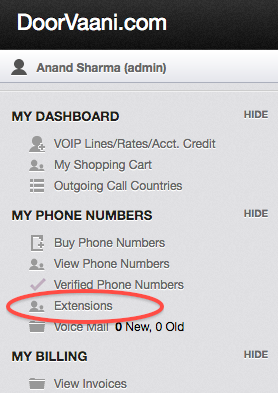
The extensions set up page can be reached from the left hand menu item ‘Extensions’ as shown below:

Extensions Menu

Extensions Menu

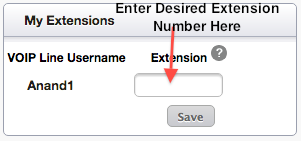
Once you are on the extensions page, simply enter your desired extension number(s) to your VOIP Line(s) and save your updates. Even if you have only one VOIP Line in your account, it is still advisable to assign an extension number so that you can easily reach your Voice Mail box.

Extensions page

Extensions Page

How to set auto renewal of phone numbers?

You can set your phone numbers to renew automatically month after month and charge the renewal cost to your available account credit. Once set the auto renewals happen 7 days before the expiry date of your phone number if sufficient credit to pay for the renewal cost is available in your account credit. On auto renewal you will get an email informing you of the completion with a link to the auto generated invoice. Set your phone numbers to auto renew to relieve yourself of manually renewing the numbers. This blog post explains how to set auto renewal of your phone numbers.

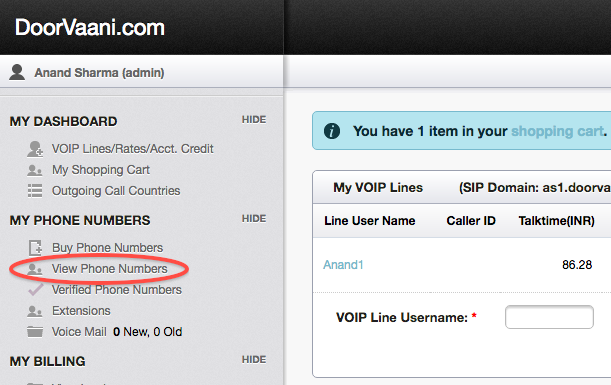
Please log in into your DoorVaani account, if not already logged in, and then click on the “View Phone Numbers” menu under “MY PHONE NUMBERS” on the left hand side. Please see the below image.

ViewPhoneNumbersMenu

In “My Phone Numbers” page, please see the “Auto Renew?” column of drop-downs with options to set the Auto Renew to “On” or “Off”. Please select the option “On” and say OK to the confirmation message.

AutoRenewDropDown

This will set your phone number to renew automatically. Just in case you do not want the auto renewals you can come back to this page any time and set the Auto Renew to “Off”.

How to use any phone number that you own as your caller id?

While making your outgoing calls from your DoorVaani VOIP Line you can set any phone number that you own as your caller ID. You do not necessarily have to buy a phone number from DoorVaani to have a caller ID on your VOIP Line. For this you need to get one or more of the phone numbers that you own verified by DoorVaani using its’ 100% automated phone number verification system. This blog post helps you understand how to get your phone numbers verified and then use the verified phone numbers as your caller ID number.

How to get a phone number verified?

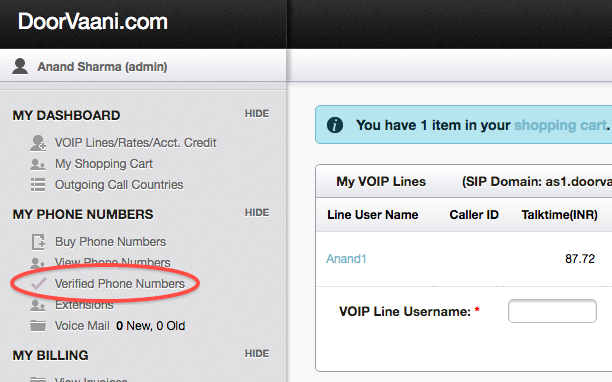
The phone numbers verification system is accessible from the “Verified Phone Numbers” menu under My Phone Numbers header as shown in the below image. Please click on this link to get to the “My verified phone numbers” screen.

Screen shot 2016-05-17 at 5.27.43 PM

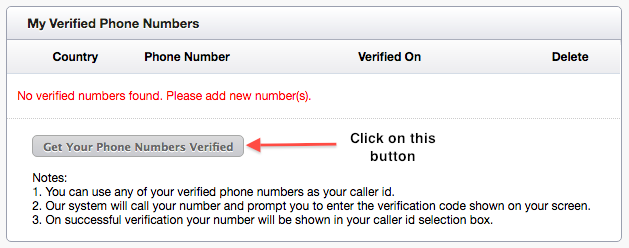
Once you are on the “My Verified Phone Numbers” screen, please click on the “Get Your Phone Numbers Verified” button as shown in the image below.

Screen shot 2016-05-17 at 5.29.24 PM

Now you will see the following screen where you can enter your phone number that you want to get verified. Please enter your phone number starting with the country code. If there is any extension number that need to be dialed after a call is connected on your phone number you can enter it in the Extension number input box. You can leave the extension blank if this is not required.

Screen shot 2016-05-17 at 5.37.44 PM

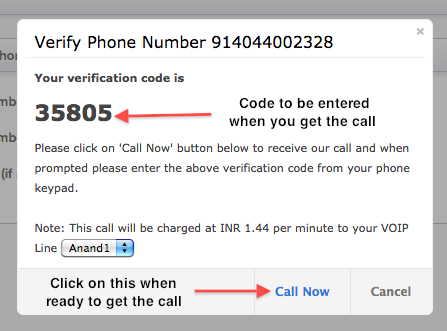
On clicking the “Verify Now” button in the above screen, you will see a five digit verification code as shown in the below screen. You will need to click on the “Call Now” button to get an incoming call on your phone number. Answer the incoming call on your phone and you will be prompted to enter the verification code you see on your screen. On entering the correct verification code your phone number will become a verified phone number.

Screen shot 2016-05-17 at 5.48.18 PM

On clicking the “Call Now” button, your phone starts ringing and you should be answering the automated call. On answering your phone, you will hear this prompt: “Hello. This is a DoorVaani phone number verification call. Please enter your verification code number”. Please enter the correct code number from your phone key pad and then you will hear “Your phone number has been successfully verified. Good bye”.

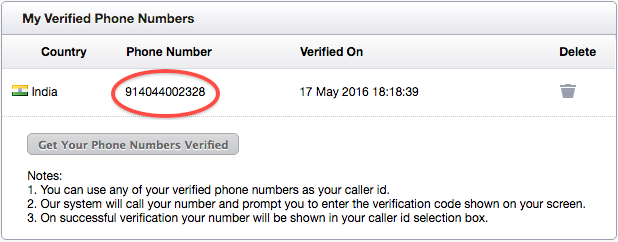
Now you an click on the “Cancel” button to close the above popup screen. You will now see your phone number listed in “My Verified Phone Numbers” screen.

Screen shot 2016-05-17 at 6.25.21 PM

How to set your verified phone number as your caller id?

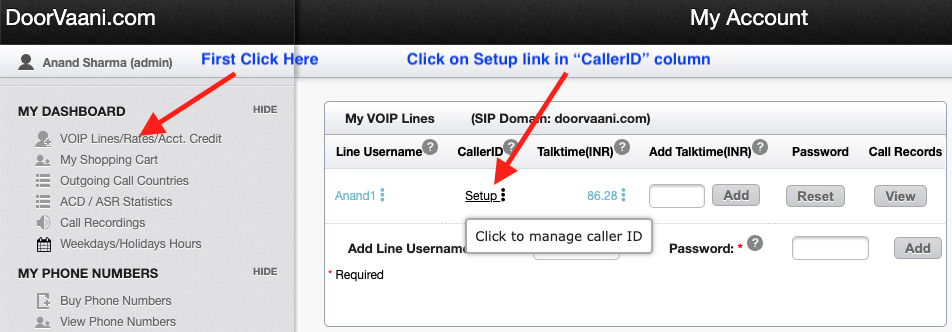
You can set your verified phone number as your caller id on the “Caller ID Setup” page. To access the Caller ID Setup page, you need to first go to  “VOIP Lines/Rates/Acct. Credit” menu under My Dashboard header and then click on your “Setup” link (or on the phone number if already have a CallerID) in “Caller ID” column in the “My VOIP Lines” page. Please see the image below:

Caller ID Setup Menu

Caller ID Setup Menu

On the Caller ID Setup page, please select “Verified Numbers” option and then select a verified number in the Caller ID drop-down box. Submit your updates. Please refer to the following screen shot with annotations for full details.

Setup_Verified_Number_as_CallerID

Setup Verified Number as Caller ID

Now all the outgoing calls you make from your VOIP Line will have your verified number set as your caller ID.

Please Note: DoorVaani sets the caller ID on your outgoing calls but it cannot guarantee that the caller ID will be displayed correctly on the destination number due to various constraints, not in its’ control, like the technology in use at the destination network and their ability to properly interpret the received caller ID and display it correctly. So caller ID is based only on best effort from DoorVaani and is not being guaranteed to work in all cases.

How to do call transfers?

DoorVaani VOIP Lines provide call transfer capabilities on both incoming calls and outgoing calls. Calls can be transferred to other extensions or other VOIP Lines in the users’ own account or to external lines like PSTN numbers. Calls transferred to external PSTN numbers will be charged a per minute rate as per the current per minute VOIP Call rate published for the transferred number in our VOIP Rates page. Calls transferred to other extensions or VOIP Lines within the users’ own account do not incur per minute call rates. Calls can be transferred to other DoorVaani users’ DID Numbers and VOIP Lines for free without incurring any per minute call cost.

 Two types of call transfers:

Both blind transfer and attended transfer are supported by the DoorVaani system. The call transfers are SIP call transfers complying with RFC 5589 standard, and the user should be using a compatible device that has the call transfer facility built in it. One such freely downloadable soft phone known to this author, that comes with both blind and attended call transfer capabilities is Grand Stream Wave for iOS and Android operating systems. Many other popular SIP soft-phones have the call transfer capabilities available in their paid versions if not in the free versions.

Attended Call Transfer: The call transferor first places the call with the transferee on hold, then calls the other party and talks to the other party in private before connecting the call to the new destination. This way the call transferor can ensure that the transfer is successful.

Blind Call Transfer: During a blind call transfer, the call is transferred to the new destination with no intervention of the transferor. The call transferor would not know the result of the transfer like the destination did or did not answer the call.

How to do the call transfer?

For the actual call transfer method the users should refer to their device user guides as these instructions are specific to their device. Basically it involves pressing the “Transfer” button and selecting the type of transfer like Blind or  Attended and then dialing the destination number. In a blind call transfer the transferor would get disconnected as soon as the destination number is dialed and the call is placed. In an attended transfer, the transferor would have to either hang-up or press a button to complete the transfer.

How to use DoorVaani Voice Mail?

Each of the VOIP Lines in your DoorVaani account comes with its own voice mail box. Your callers have the option of leaving you a voice mail message in the event you are unavailable to take the call or busy on other phone lines. This blog post explains how to make the best use of your voice mail.

How to access voice mail setup options page?
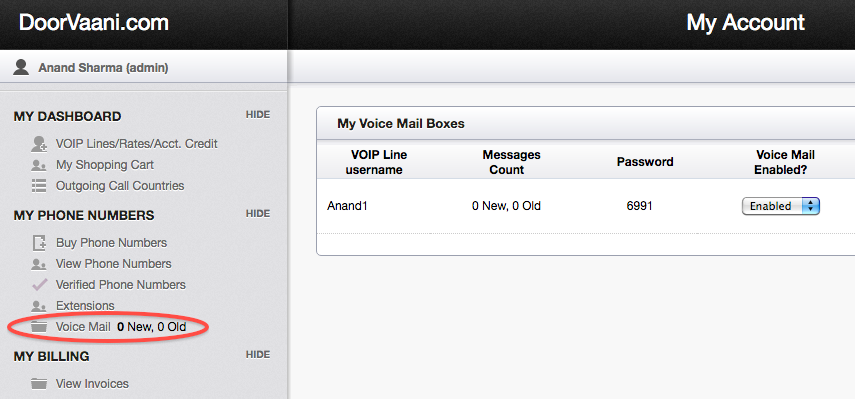
voice mail menu

Voice Mail settings page menu

Please login into your DoorVaani account and then click on the “Voice Mail” menu as shown in the above image.

How do I know my voice mail password?

Voice mail box is automatically created when you create your VOIP Line. You would need a password to enter your voice mail box to listen to your messages or to administer your voice mail options. A four digit numeric password is created when your mail box gets created. You can see this password that was created for you on the “Voice Mail” settings page.

Voice Mail Password

Voice Mail password shown on the Voice Mail settings page.

Just in case you do not want to have the Voice Mail service on your VOIP Line you can simply “disable” it by selecting “Disabled” in the “Voice Mail Enabled?” drop-down box. Please see the image above.

When a new voice mail message arrives in your voice mail box, you will be email notified on the email id that is set up in the “Notify by E-mail Id” input box. By default this email id is set-up same as your DoorVaani account login e-mail id. You have the option of changing this email id as per your needs. Just in case you do not want to be email notified simply blank out this email id input box and then hit the update button.

How to listen to the Voice Mail messages?

There are two ways to login into your voice mail box and listen to your voice mail messages.

  1. From the device you use to make and receive phone calls – registered to DoorVaani server
  2. From any other phone not in DoorVaani network – you would need a DID Number to use this option

From your device, registered in DoorVaani network, you can dial your own extension number or your own DID Number if you have one, or your alpha-numeric VOIP Line username. If you have not yet associated an easy to use extension number to your VOIP Line you can do so now by visiting the extensions page accessible from the left side menu. Once your call is connected you will be prompted to enter your voice mail password. On successful login you can follow the menu options read out to you and listen to your voice mail messages.

If you have a DID Number, you can call your DID Number from any other network or from PSTN and while your voice mail greeting is playing, you should enter ‘*’ (star key) to hear the password prompt. After entering the correct password you will be presented with the same voice menu options as above and you can listen to your voice mail messages.

How to record custom greeting messages?

You can record your own custom greeting messages, one for unavailable status and one for busy status. While in your voice mail box, please select option 0 (zero) for Mailbox Options and then select option 1 to record your ‘unavailable’ greetings message and option 2 to record your ‘busy’ greetings message. You can also record your name by selecting option 3.

If you have not recorded your unavailable greeting or busy greeting but have recorded your name, the voice mail system will play a generic message: “Recorded name is not available.” or “Recorded name is on the phone.” as appropriate.

If you have not recorded your unavailable greeting or busy greeting and have not recorded your name, the voice mail system will play a generic message:“The person at extension is unavailable.” or “The person at extension is on the phone.”

How to change my voicemail box password?

Login into your voice mail box using your current password and then select option o (zero) for Mailbox Options followed by option 5 for changing your password.

What is temporary greeting?

You can record a temporary greeting and if it exists, it will always be played instead of your “busy” or “unavailable” greetings. This could be used, for example, if you are going on vacation or will be out of the office for a while and want to inform people not to expect a return call anytime soon. Using a temporary greeting avoids having to change your normal unavailable greeting when you leave and when you come back. To record a temporary greeting, please select option 0 (zero), then option 4.

After you return to the office, the temporary greeting should be erased. The voice mail system presents different menu options when a temporary greeting is set. Log into your mailbox, then press 0, 4 for the temporary greeting menu.

  1. (Re)-record your temporary message.
  2. Erase your temporary greeting.

Organizing voice messages into folders:

DoorVaani voice mail system allows you to save and organize your messages into the following folders:

0 : New messages

1: Old messages

2: Work messages

3: Family messages

4: Friends messages

Options after Recording a Message:

If the caller pressed the # button to end the recording, the caller will be presented with the following options:

1: Accept this recording

2: Listen to the recording

3: Re-record the message

Recommended configuration after first time login:

The first time that you log into your mailbox, you should configure your personal mailbox options. These include:

  • Recording your name.
  • Recording your unavailable greeting.
  • Recording your busy greeting, if desired.
  • Changing your password.

Voice Mail Menus:

Main menu: The main menu will be the first menu you hear when you have logged in. Here are the main menu options:

1. Listen to new messages (the default) or listen to old messages if there are no new messages.

2. Change folders.

3. Advanced options.

0  (zero) Mailbox options (see below).

*   Help (repeat the menu options).

#   Exit from the voice mail system.

Mailbox Options in the Main Menu: Pressing 0 (zero) from the main menu will present the mailbox options menu.

1     Record your unavailable message.

2     Record your busy message.

3     Record your name.

4     Record your temporary greeting.

5     Change your password.

*     Return to the main menu.

The Message Envelope:

The message envelope is a recording listing details about the message. This consists of:

  • The position of the message in your list of messages
  • The date and time that the message was received
  • Caller ID information
  • The duration of the message

After Message Playback:

After the message has been played back, the system will play a prompt and wait for you to press a button:

1     Go to the first message in the current folder.

2     Change folders.

3     Advanced options.

4     Go to the previous message in the folder.

5     Repeat the current message.

6     Go to the next message in the folder (this will only be offered if there is another message).

7     Delete or undelete the message (only if it was just deleted in the current session).

8     Forward the message to another user.

9     Save this message in another folder (you will be asked which folder to use).

0     Mailbox options (see “Mailbox Options in the Main Menu”, above).

*     Help (repeat the menu options)

#     Exit the voice mail system.

This prompt will repeat after a short pause if no key is pressed.