Monthly Archives: February 2018

Install And Configure ZoiPer5 on Mac OSX

This blog post helps you in installing ZoiPer5 on Mac OSX and also configure it to work with your DoorVaani account. Please refer to the screen shots and follow the annotations made on those screen shots. If you don’t have a DoorVaani account yet, please register for free here to create one.

  1. To download ZoiPer5 please go to www.zoiper.com and click on the Download link and then select the free community version. Once download is completed, please click on the downloaded .pkg file to start the installation process. Once the installer opens click on ‘Continue’ button on the introduction screen.

    Installer Introduction screen

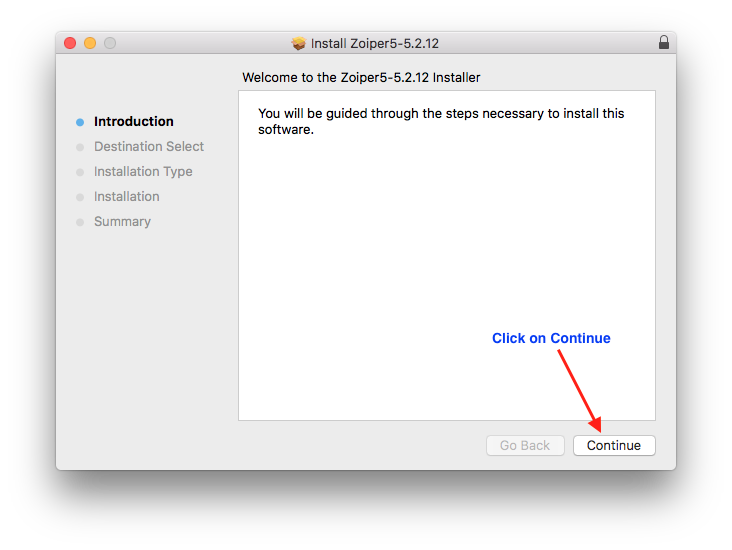
    Installer Introduction Screen Click on Continue

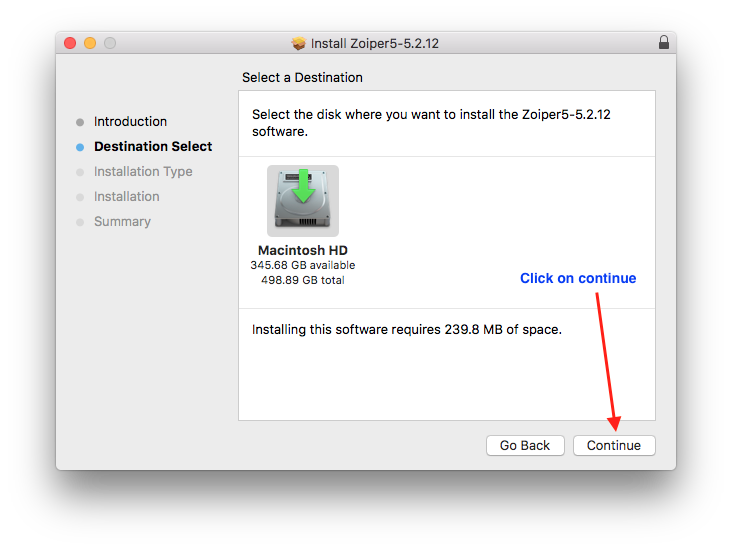
  2. Please click on ‘Continue’ after selecting the hard disk on which you want to install ZoiPer5.2InstallerDestinationSelectContinue
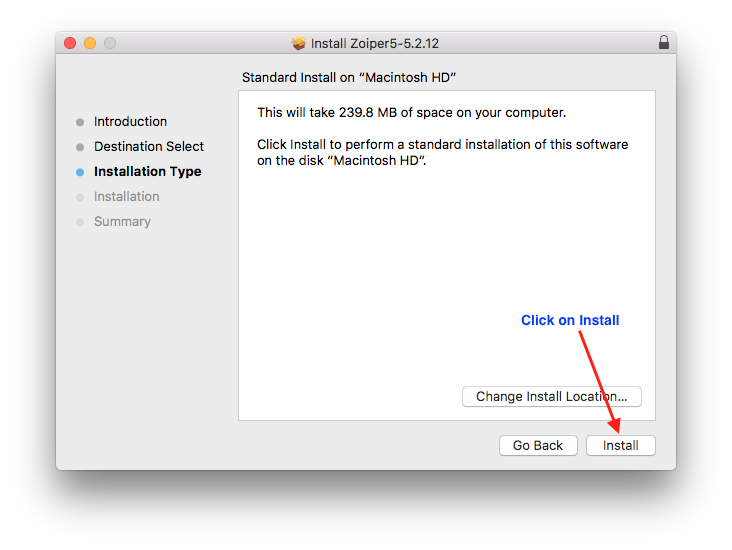
  3. Click on ‘Install’ button to do the standard installation.3InstallerInstallationType
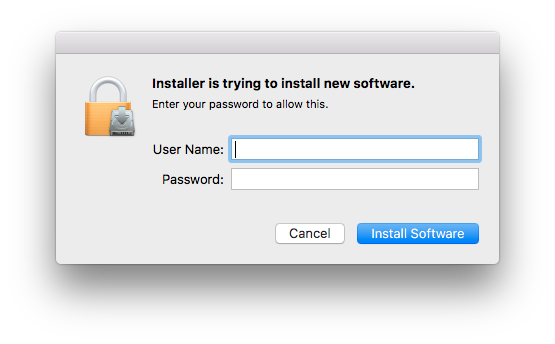
  4. Enter your Mac admin username and password and click on Install Software.4Installer_Mac_Username_Password
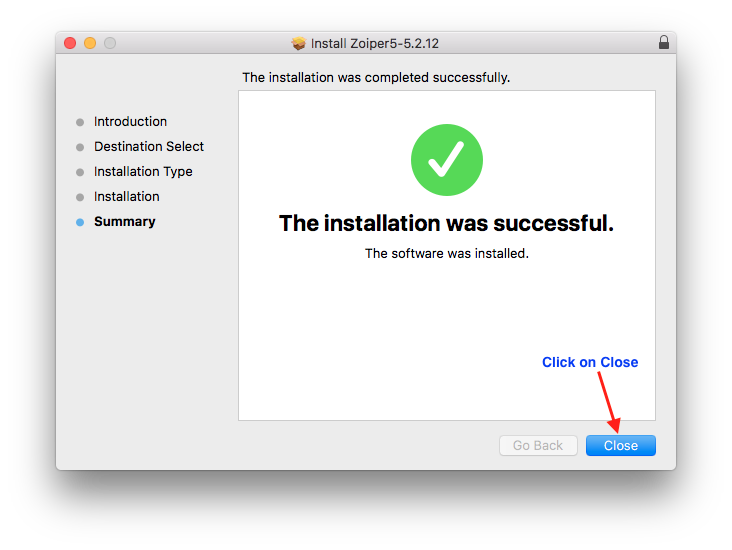
  5. Allow the installation to complete and finally you will see the installation success screen. Now you can close the installer by clicking on the close button.5InstallerSummary
  6. Once the installation is complete you may either keep the downloaded package or Move it to Trash.6InstallerPackageTrashOrKeep
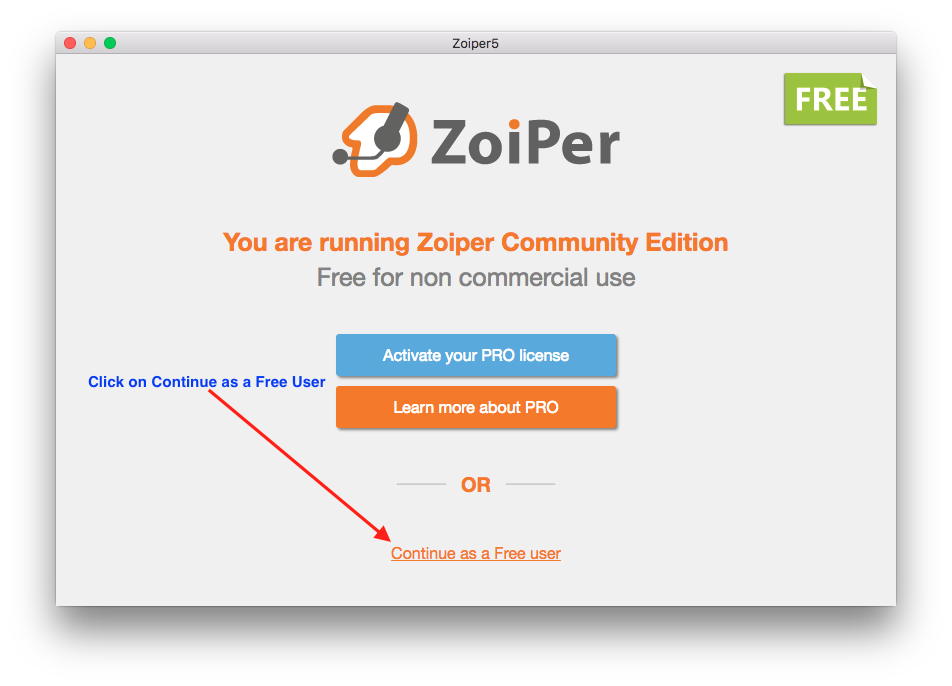
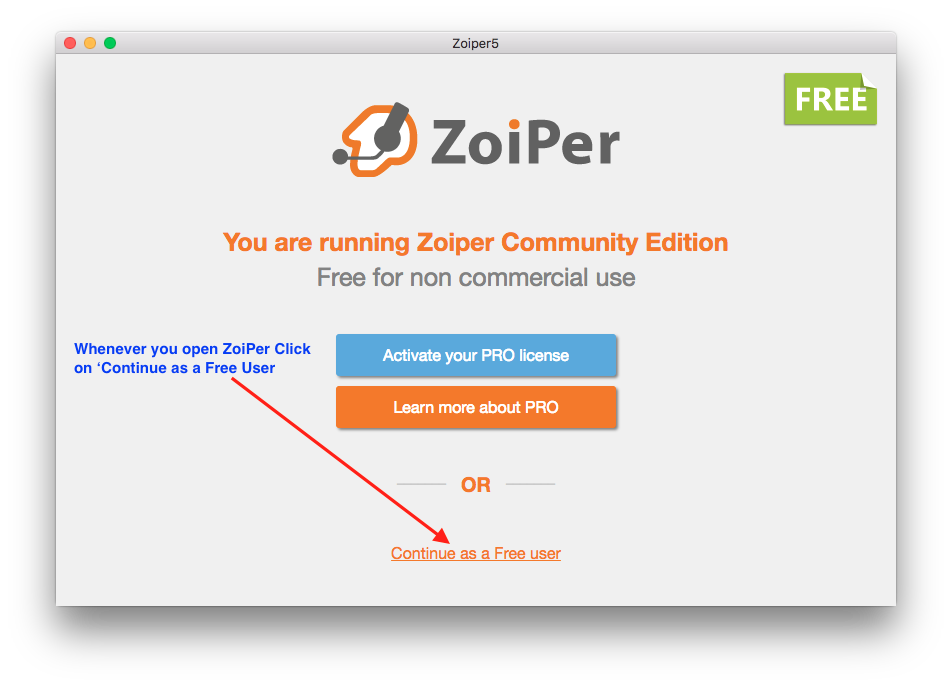
  7. Now go to your Mac Applications folder and double click on ZoiPer5 to open it. Once the ZoiPer is open please click on “Continue as a Free User”.Configure1ContineAsFreeUser
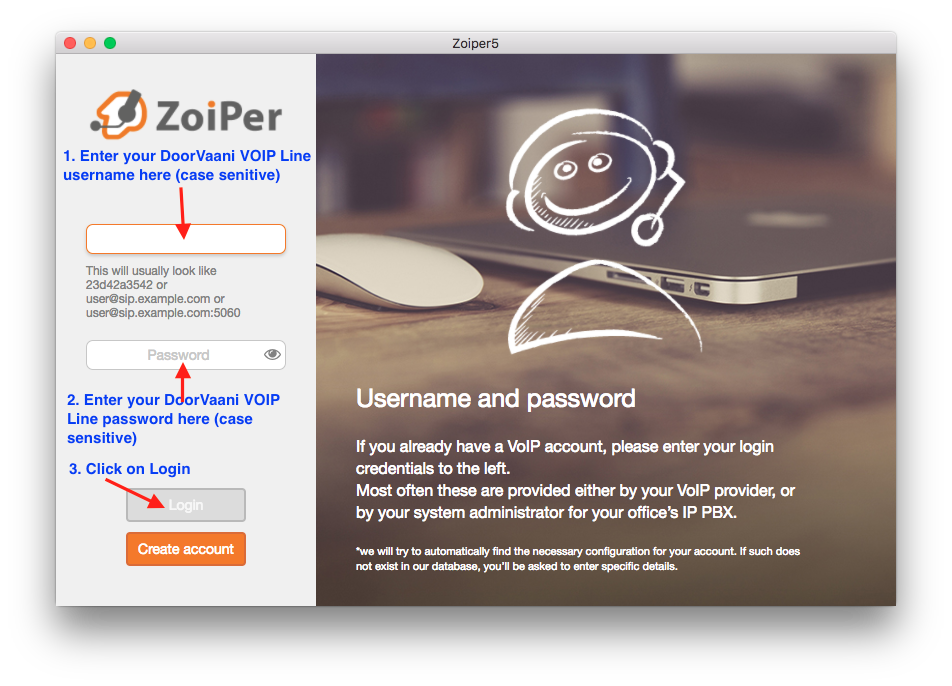
  8. Now enter your DoorVaani VOIP Line username and password and click on ‘Login’. Please note that both VOIP Line username and password are case sensitive. If you do not have DoorVaani VOIP Line username and password you can create one for yourself. Please click here to learn how to create a VOIP Line username and password. If you forgot your VOIP Line password you can reset it.Configure2EnterLoginCredentials
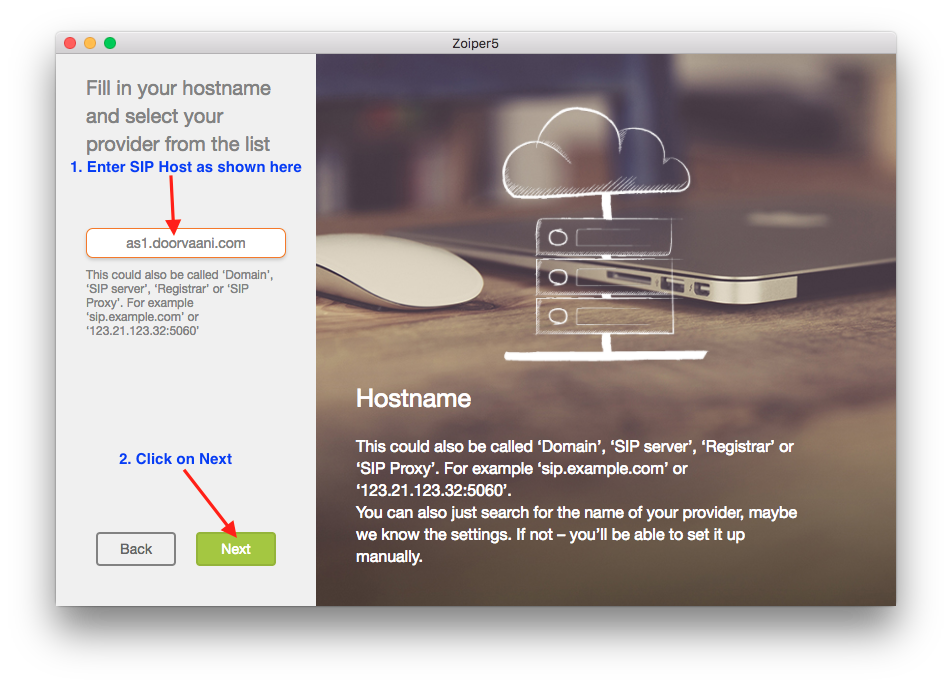
  9. Please enter the SIP Hostname: as1.doorvaani.com and click on the Next button. Please ensure that you spell the hostname correctly.Configure3EnterSIPHostAndNext
  10. Skip the optional Authentication and Outbound proxy entry screen.Configure4OptionalAuthOutProxySkip
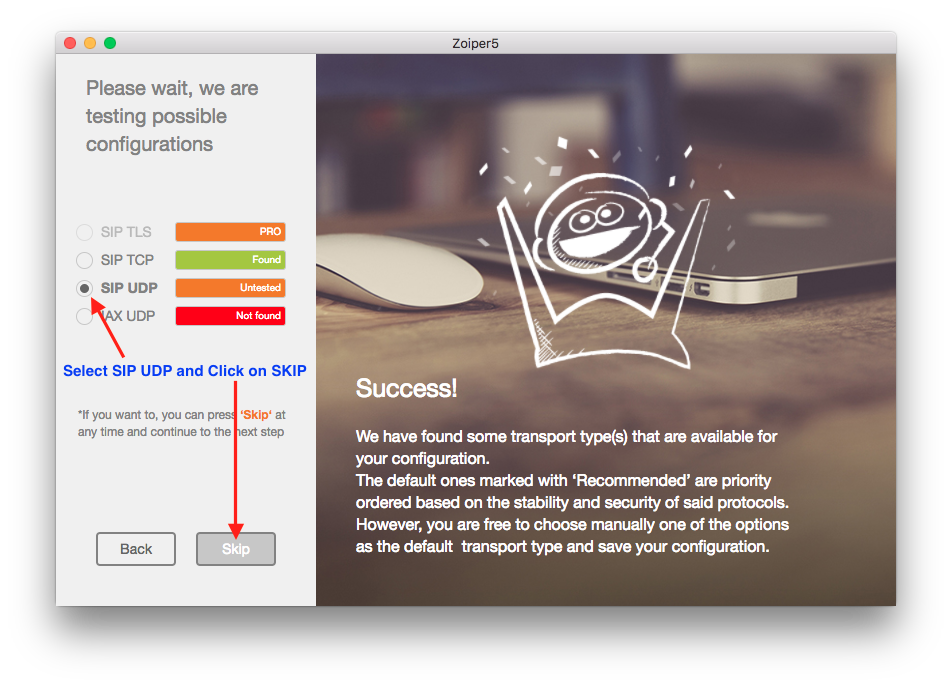
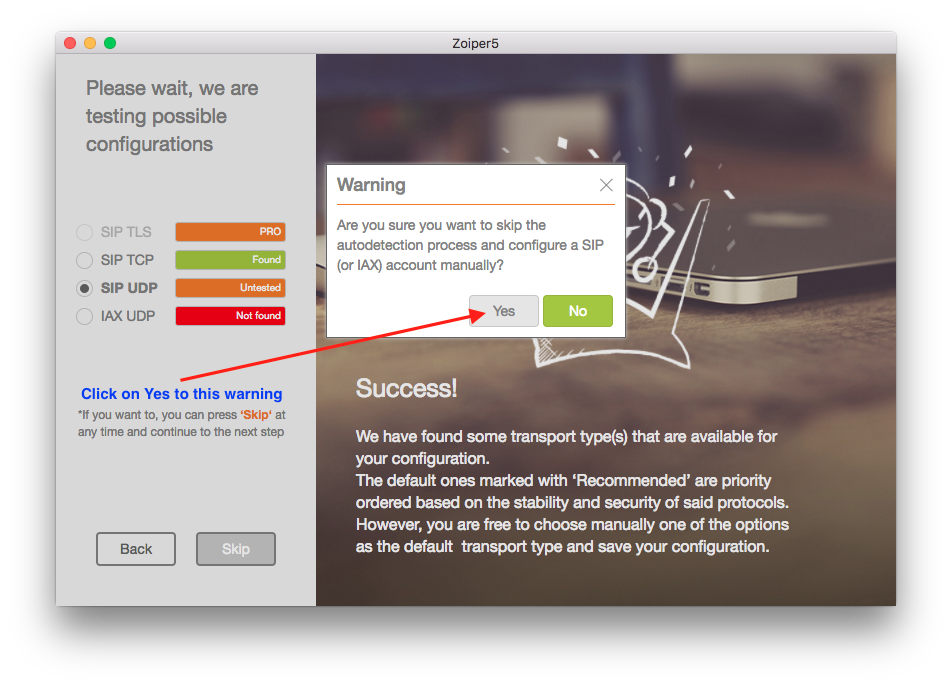
  11. Please select SIP UDP and click on skip. You can select this SIP UDP option even if the configuration screen shows it as ‘untested’.Configure5SelectSIPUDPAndSkip
  12. Please click on “Yes” to the Warning message.Configure6YesToSkipManualConfigWarning
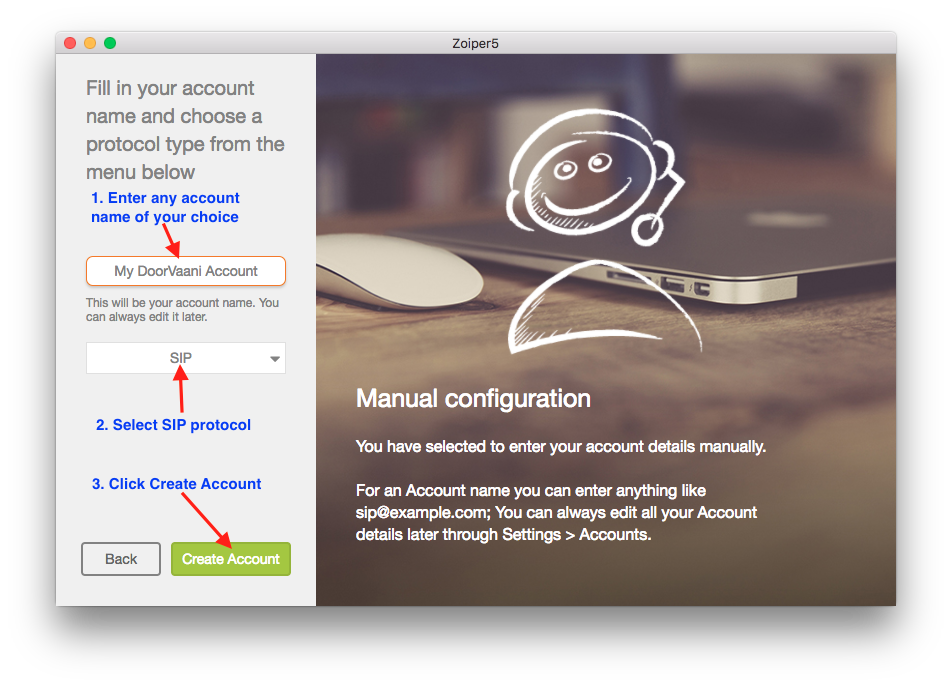
  13. You can select default account name or change the name to anything of your choice. Select the protocol as SIP and then click on Create Account button.Configure7AcctNameProtocol
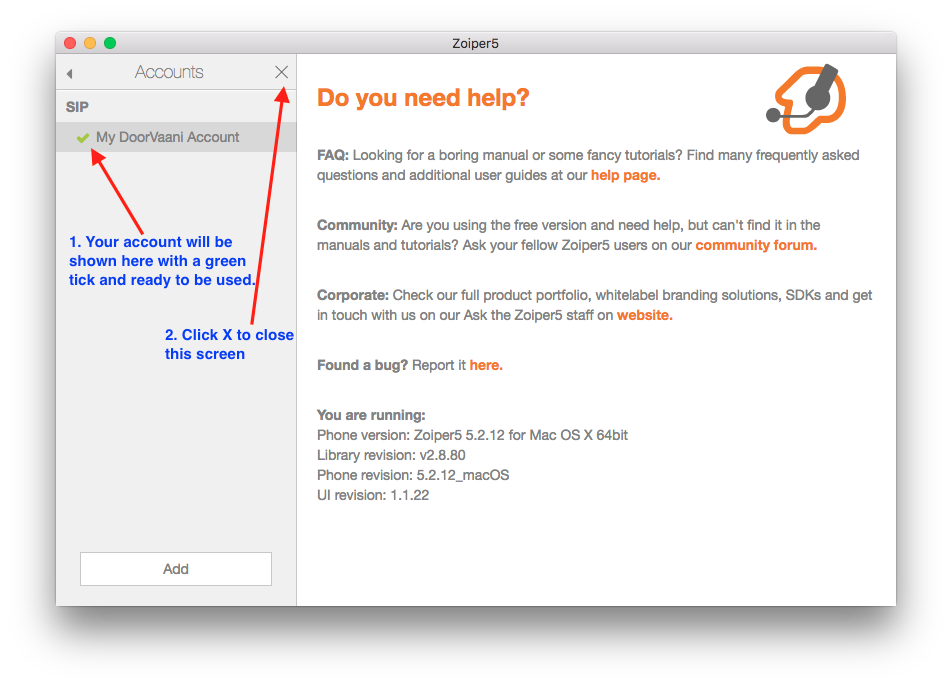
  14. Your account will be created and shown to you on the Accounts screen. You should see a green tick mark by the side of your account as soon as it successfully registers to our SIP Server. You can close the Accounts screen by clicking the X as shown in the picture below.Configure8AcctCreatedCloseX
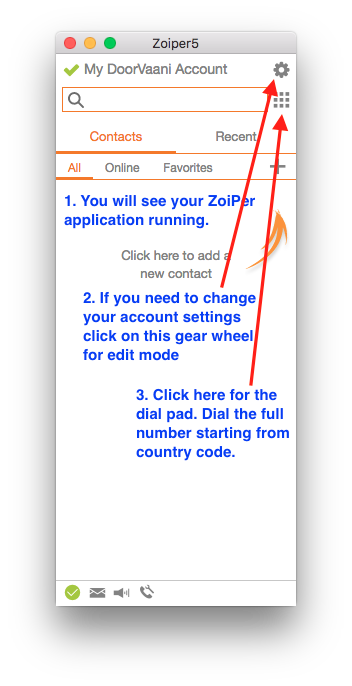
  15. You should now see your ZoiPer5 running on your computer. If you need to change anything in your account configuration, please click on the settings gear wheel and then select the account to see the configuration details. You can edit these details like your VOIP Line username, password, SIP Hostname and Account name on the Account Settings screen. To start dialing out numbers, please click on the dialpad icon and enter the full number starting from the country code.
    Configure10ZoiperRunning
  16. The next time you open ZoiPer you should click again on “Continue As a Free User” link.Configure9ContinueAsAFreeUser
  17. You must keep your ZoiPer always running on your computer to receive inbound calls. You can minimize it to tray but should keep it always running.

Best Match Caller ID – Dynamically assigned based on the called phone number

The challenge of achieving higher call answer rates on your outbound campaigns is faced by most of the tele marketers. The most important piece of information your call recipients are looking at while your call rings on their end is your Caller ID. Projecting a local presence through your Caller ID to your call recipients helps a lot here as they are more inclined to take local calls and calls from their own region. DoorVaani’s “Best Match Caller ID” comes to your help here.

What is Best Match Caller ID?

Best Match Caller ID is a set of caller ID numbers chosen by you from your DoorVaani Account’s DID Numbers, Toll-free numbers and Verified Numbers. You can have either all or some of your DID, Toll-free and Verified Numbers in this “Best Match Caller ID” set as per your needs. Best Match Caller ID set is VOIP Line specific so if you have multiple VOIP Lines in your account each one of your VOIP Lines can have its own Best Match Caller ID set.

How it works?

You just dial the phone number and our system analyses it in realtime and automatically picks one of your DID/Toll-free/Verified Numbers nearest to the called destination city/area code/country/region and sends it as your Caller ID.

For example if you dial a New York USA 1-917 number and if you have a 1-917 number in your DoorVaani Best Match Caller ID set then that 1-917 number will be dynamically set as your caller ID for that call. On the next call if you Dial a Toronto Canada Number and you have a Toronto Canada number in your DoorVaani Best Match Caller ID set then that Toronto Canada number will be dynamically set as your caller ID for that call. If you don’t have any number that matches with the country and city code that was called, then any other number from your Best Match Caller ID set that belongs to the called country will be set as your caller ID for that call. If no Number of the called country is in your Best Match Called ID set, then any other number in the same region will be set as your caller ID for that call. If the system finds more than one number that qualifies as your Best Match Caller ID then one of those numbers is randomly selected and used as your Caller ID.

How to set-up Best Match Caller ID?

After you login into your DoorVaani account, please click on the link in the “Caller ID” column of your VOIP Lines listing page. This link could say “Setup” or “Best Match” or show the DID/Toll-free number already setup by you. This takes you to the Caller ID Setup page of the VOIP Line you clicked on. If you have multiple VOIP Lines in your account, you will be able to set the Caller ID on each one of them separately.

My VOIP Lines Page Caller ID Setup Link

My VOIP Lines Page Caller ID Setup Link

On the Caller ID Set up page you will see the following three options to choose from:

Option 1. DID Numbers – This allows you to pick one of the DID or Toll-free numbers that are in your account as your Caller ID.
Option 2. Verified Numbers – This allows you to pick one of your Verified Numbers as your Caller ID.
Option 3. Best Match to Called Number – You can select one or more of your DID Numbers, Toll-free numbers and Verified Numbers, to include in the set of numbers from which to dynamically pick a best match to the outbound number as your Caller ID. When you buy more DID or Toll-free numbers or get more numbers verified in your account, please revisit this page and add those new numbers into the Best Match Caller ID set if you so desire.

Caller ID Set Up Page with Best Match Caller ID Option

Caller ID Setup page with Best Match Caller ID Option selected

Best Match Caller ID Tester:

When you select the ‘Best Match to Called Number’ option you will have access to a ‘Caller ID Tester’. You can see the Caller ID that would have been used on your outbound call to the number entered in this tester without you making any real outbound call. This Caller ID Tester helps you understand how the Best Match Caller ID works without the need of making any real outbound calls.

Best Match Caller ID Tester

Best Match Caller ID Tester

Note: The actual Caller ID that was sent out on your outbound calls can be seen by you in your call detail records.