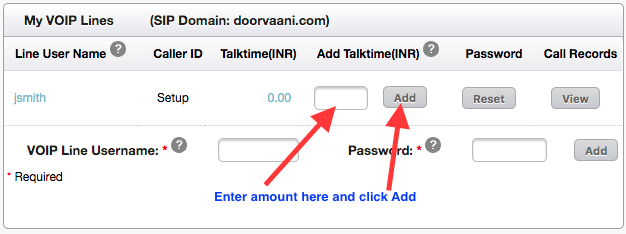
“GrandStream Wave” is a Soft-phone app that can be installed on your Android mobile phone and can be very easily configured to work with your DoorVaani SIP account. If you don’t have a DoorVaani SIP account, you can register your account for free now and then create your SIP account (a.k.a VOIP Line) for free. Please go to Google PlayStore on your Android Phone and then search for “GrandStream Wave” app. Download, install and then open the app and follow this easy to use guide with screenshots to configure it.
- Tap on “Settings” Gear icon at the bottom right hand corner.
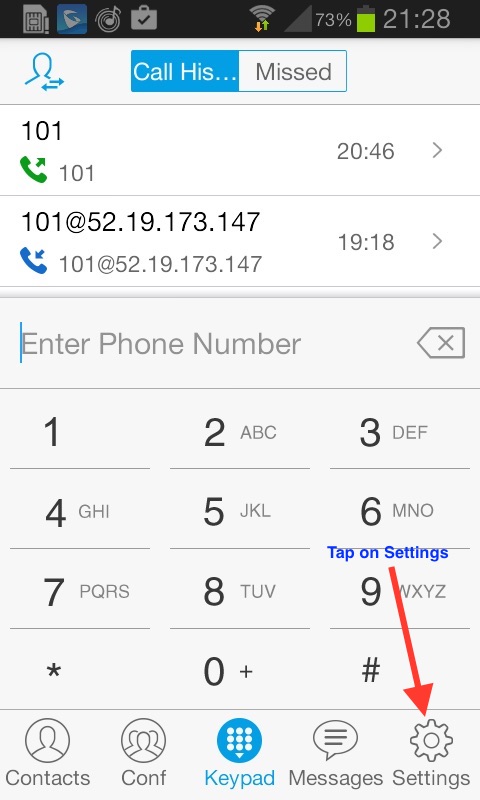
Tap on Settings
- On the “Settings” screen tap on “Account Settings”.
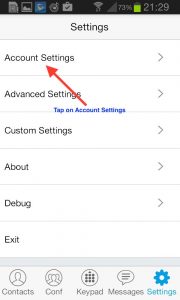
Account Settings
- Tap on the “+” sign in the top right to add a new SIP Account.
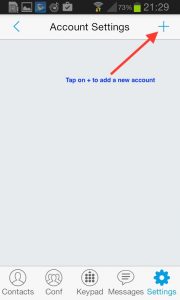
Tap on + sign
- Tap on “SIP Account”.
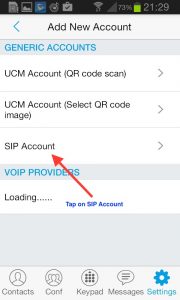
Tap on SIP Account
- You will see the blank “Add New Account” screen.
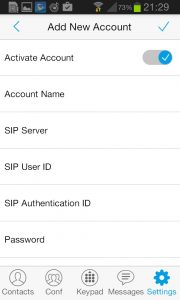
Blank Add New Account Screen
- Enter any account name of your choice, for example: “DoorVaani Account” and tap on OK.

Enter Account Name
- In the “Add New Account” screen (step 5), tap on “SIP Server” and then enter your DoorVaani SIP Server name: as1.doorvaani.com and tap on OK.
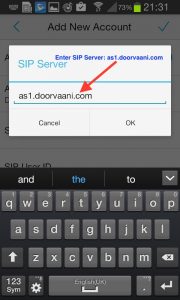
Enter SIP Server
- In the “Add New Account” screen (step 5), tap on “SIP user ID” and then enter your DoorVaani VOIP Line username (case sensitive) as created by you in your DoorVaani account. Tap on OK.
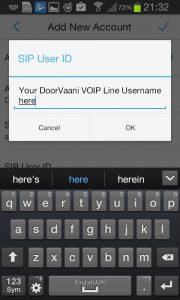
Enter SIP User ID
- In the “Add New Account” screen (step 5), tap on “SIP Authentication ID” and then enter your DoorVaani VOIP Line username (case sensitive). Note: Your SIP Authentication ID is same as your SIP User ID. Tap on OK.
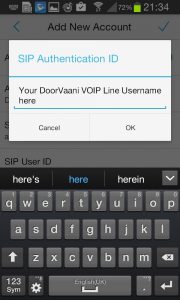
Enter SIP Authentication ID
- In the “Add New Account” screen (step 5), tap on “Password” and then enter your DoorVaani VOIP Line password (case sensitive) as created by you in your DoorVaani account. Tap on OK.
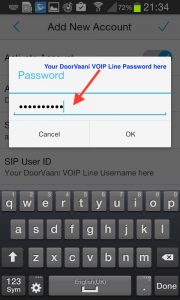
Enter SIP Password
- In the “Add New Account” screen (step 5), tap on the tick mark in the top right corner to save your account settings and also to register your VOIP Line to our server. After entering all of your account details your screen looks as shown in the following screen shot.
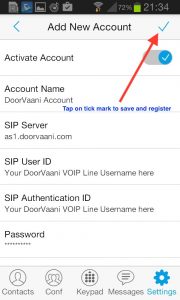
Tap on the tick mark to save your account
- Once your account successfully registers to our server, you will see your account name listed on the “Account Settings” screen with a green dot. Now you can tap on the “KeyPad” at the bottom and start dialling outgoing calls. Please refer to step 1 above to see the screen shot of the KeyPad. Please enter “complete called phone number” starting from the country code in International format.
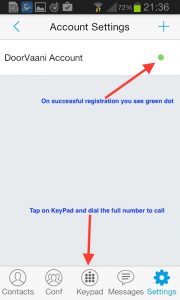
Green Dot Shown on registration.
- To call extensions within your own account, you can simply dial the short extension number of your called person.
Important Note: To receive inbound calls, please ensure that your Soft-phone is always open and kept running on your mobile phone in the back ground. You can receive calls only when your soft-phone is kept open and running.