


LiveAgent is a well known cloud based Multi-channel Customer Service software (SaaS) provider. DoorVaani is a LiveAgent accredited VOIP Service provider with native integration of voice channels and DID Phone Numbers in LiveAgent panel. Once integrated, all of your inbound and outbound voice call interactions with your customers get logged and recorded in LiveAgent panel so that you can efficiently manage them leading to highly satisfied customers. This blog post details how to setup LiveAgent to use DoorVaani VOIP Service and DoorVaani DID Phone Numbers.
- If you have not yet signed up with DoorVaani – please do it now for free. Please click here to register your DoorVaani.com account now in about a minute or less.
- Once you register your account, you will be able to login into your DoorVaani.com account and immediately create a VOIP Line(a.k.a SIP Trunk or SIP Account). The VOIP Line credentials as entered by you while creating your DoorVaani VOIP Line will be needed by you to enter into the LiveAgent Panel (step 8 below) to get the integrated service.
- Please buy a Phone Number (Local Phone Number or Toll-free Phone Number) to be entered in LiveAgent to i) get inbound calls from your customers and ii) set it as your CallerID on your outbound calls. You can buy the Phone Number from the “MY PHONE NUMBERS > Buy Phone Numbers” left hand side menu in your DoorVaani.com account.
- Once you have the VOIP Line credentials and a Phone Number from DoorVaani.com – you have everything to do the integration in your LiveAgent Panel. Please login into your LiveAgent panel using the login details provided to you by LiveAgent.
- To use the voice call channels in LiveAgent, please ensure calls are “Enabled” in your LiveAgent. By default LiveAgent sets Calls as “Enabled”. To check this, please click on “Configuration” gear wheel icon (at the bottom left corner of your LiveAgent panel), then click on “Call” menu (in configuration menu) and you should see “Enable Call” as checked “on” as shown in the following screenshot.
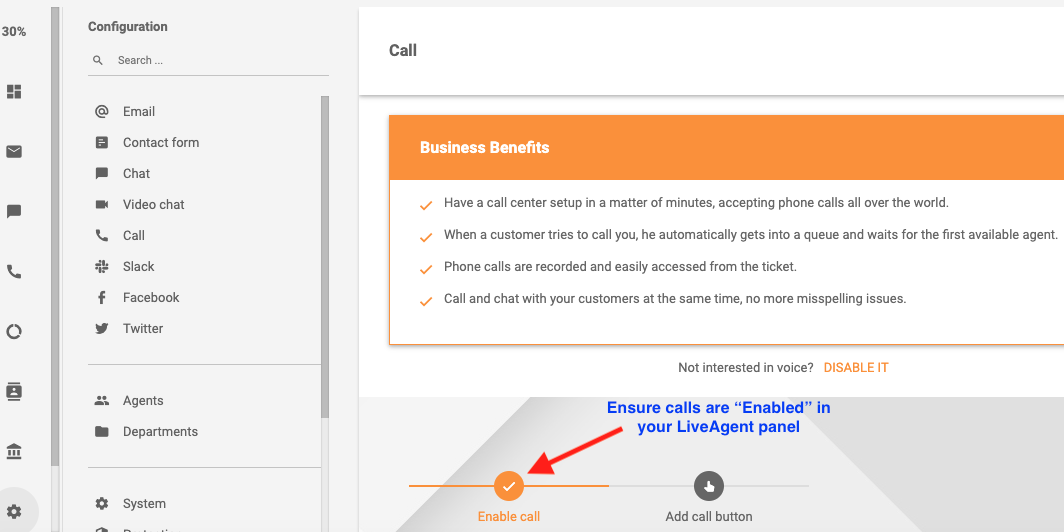
Ensure Calls are Enabled
- To add the Phone Number in LiveAgent Panel: Click on “Configuration” gear wheel icon, then click on “Call” followed by click on “Numbers” in the configuration menu. Now click on “Add” (+) button on the Numbers page that opens up. Please refer to the following screen shot.
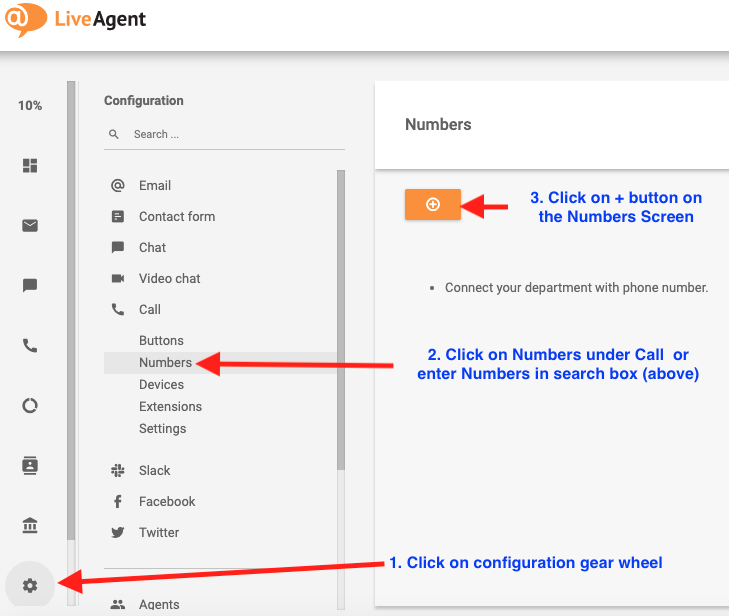
Numbers Add Button
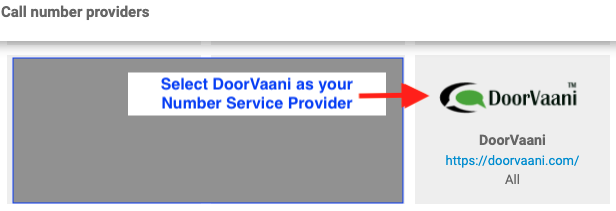
- On the “Call Number Providers” screen – Select DoorVaani as your Phone Number provider.
- On the “SIP Number Provider” screen you need to enter the Phone Number you got from DoorVaani (Step 3 above) and enter the VOIP Line username and password as created by you in Step 2 above. Please ensure that both VOIP Line username and passwords are case sensitive. You need to enter both of these exactly like you have them in your DoorVaani.com account. Just in case you forgot the VOIP Line password, you can reset it in your DoorVaani.com account. Please refer to the following screen shot and the annotations there on to correctly configure your Phone Number.
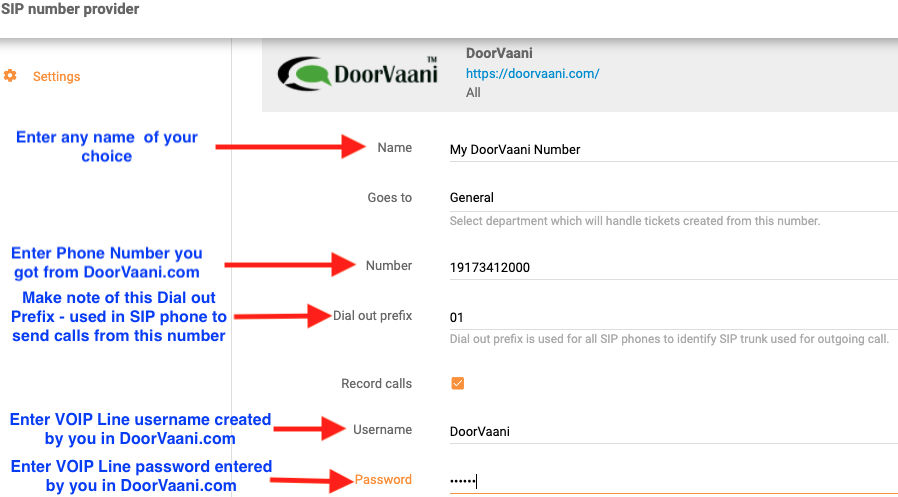
DoorVaani Number and VOIP Line credentials
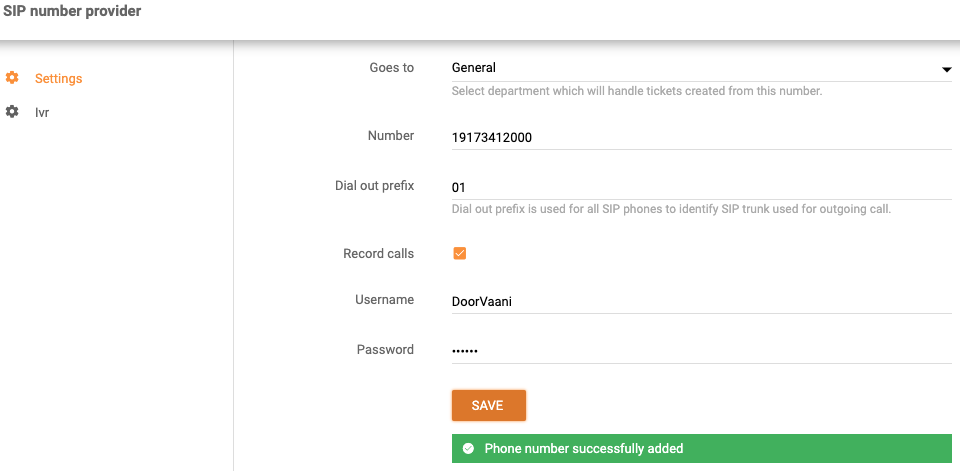
- Please click on “Save” button and ensure you get a success message. LiveAgent will then connect to our SIP Server using your VOIP Line username and password (a.k.a SIP Trunk). This process is known as SIP Registration. This SIP registration must be successful with no errors. If you see any errors, please ensure you entered the correct Username and Password (both are case sensitive) and also ensure you entered correct Phone Number starting from the country code in E-164 format. How to ensure the SIP registration is successful is discussed below in step 11.
Click on Save button
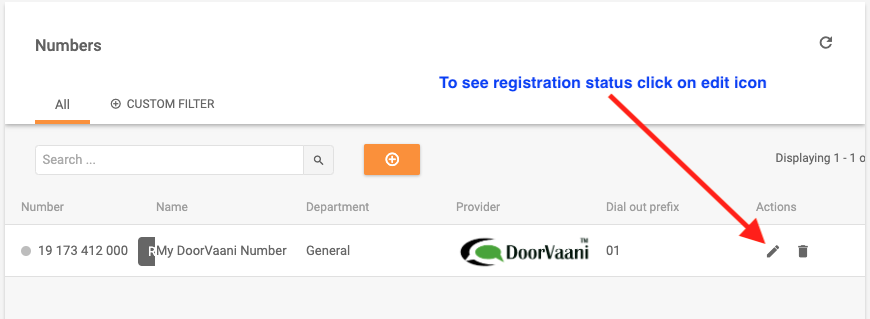
- Once the Phone Number is successfully added it will show up in the “Configuration > Numbers” screen. On this screen click on the “Edit” Icon in the “Actions” columns to see the SIP Registration status of this SIP Trunk.
Phone Numbers – Click on edit icon
- On the phone numbers edit screen – ensure that the “Registered State” is “the UAC is successfully registered” as shown in the following screen shot. Any issues must be resolved here before proceeding any further. Most common issues are incorrect VOIP Line username and password (Both are case sensitive). Correct them if required. If you did VOIP Line password reset, please ensure the new password is entered. Any future password resets must be immediately followed by updating here in LiveAgent panel – numbers edit screen.

Ensure Registered State of uac is successful
- One or more “devices” (SIP Phones) are to be added now. A “device” can be either a VOIP Soft-phone or a Hardware IP-Phone. The configuration in LiveAgent is independent of the actual device you are going to use to make and receive VOIP Calls. This step simply gives you the SIP Credentials (username and password along with host name) that you will need to connect the actual device. You can use any standards compliant device and you can change the device at any time if needed. Suggested soft-phone device is “ZoiPer IAX SIP Soft-phone” (for Windows / Mac PCs or Android/iOS Mobiles) and suggested Hardware IP Phone is GrandStream GXP1620 (or GXP1625). These are just suggestions any you can use any standards compliant (RFC3261) device of your choice. To add a device, click on Configuration Gear Wheel and then click on “Devices” item under “Call” and click on + button. If you don’t see “Devices”, please search for “Device” in the configuration search box. Please refer to the following screenshot.

Create Device Button
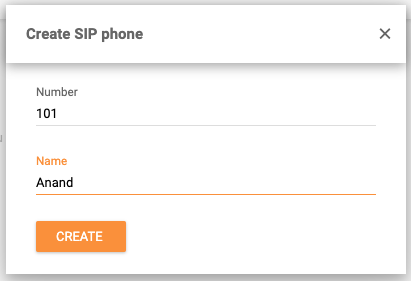
- On the “Create SIP Phone” Screen – Please enter any number and any name of your choice to identify this device and click on the “Create” button.
Create Device – SIP Phone
- Once the device is created, you can see it listed on the devices page. Please click on the “View” icon in the “Actions” column to see the SIP Credentials(SIP Username, SIP password and Host) of this device (SIP Phone).
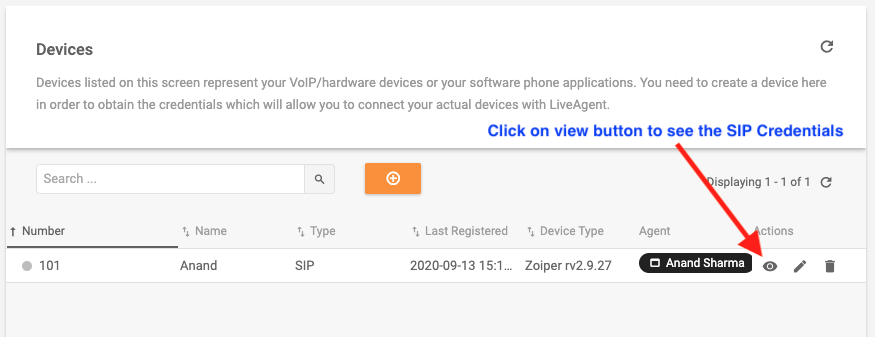
Devices – SIP Phones
- Make a note of the correct SIP Credentials (Host, Username and password) from the “View SIP Phone” page. Enter these credentials in your agent’s soft-phone or IP Phone and ensure that the phone device is successfully registered to the LiveAgent SIP Host. If you are using ZoiPer Soft-phone, you can search for ZoiPer configuration for your platform in this DoorVaani blog. For example configuring ZoiPer on Android is described here with screen shots.

View SIP Phone Credentials
- If not already created, you need to create one or more agents in your LiveAgent panel. To add agents, click on configuration gear wheel, click on “Agents” menu in configuration and the click on + button. Please refer to the following screenshot with annotations.
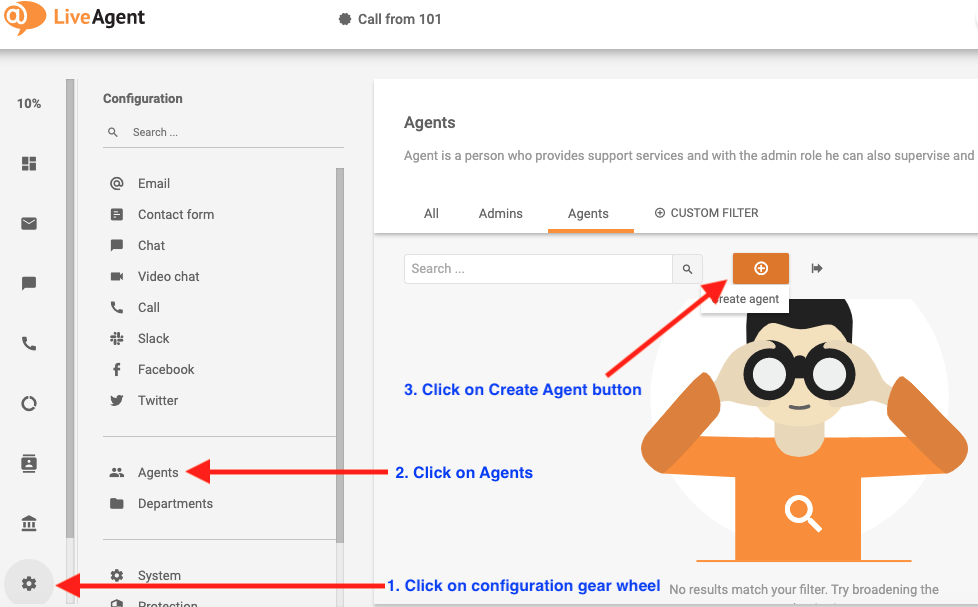
Create Agent Button
- Enter agent details with correct E-mail id and click on the “Create” button. LiveAgent will email login credentials on successful creation of the agent. The agent can use the credentials received in E-mail and login into LiveAgent panel.
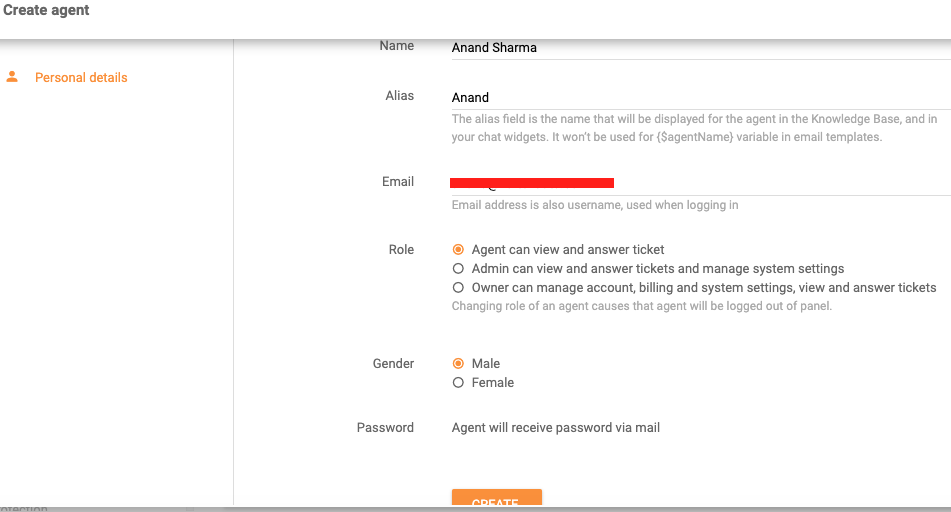
Create Agent Screen
- Once the agent is successfully created, you can see the agent row on the “Agents” screen. Please click on the edit icon – as shown in the screenshot below – to set the device to be used by the agent. Assigning the device to the agent is very important to make and receive calls by the agent through the device assigned here.
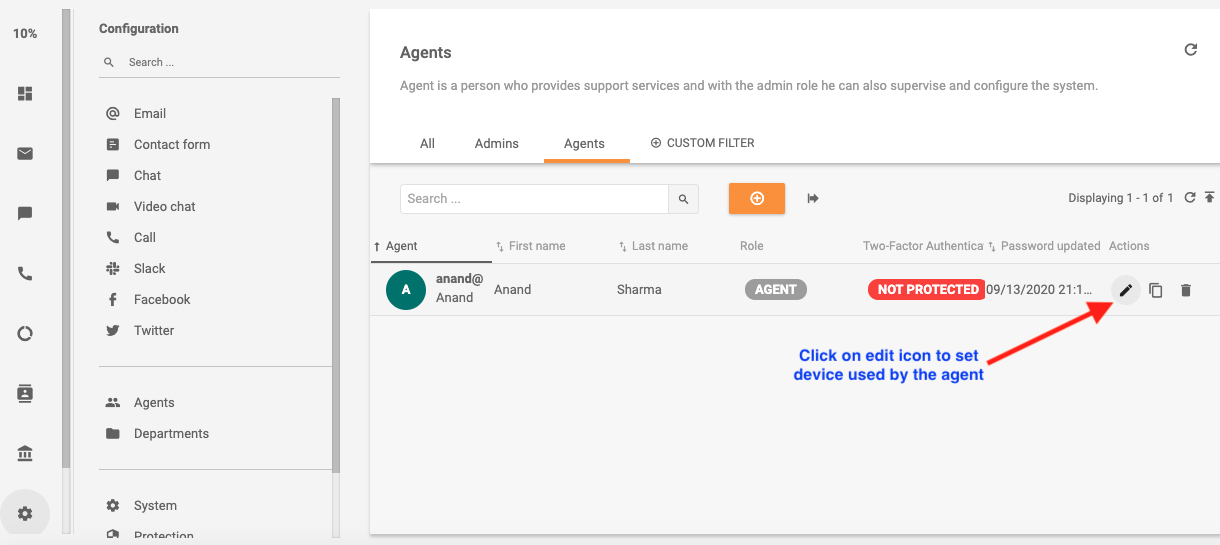
Edit Agent icon
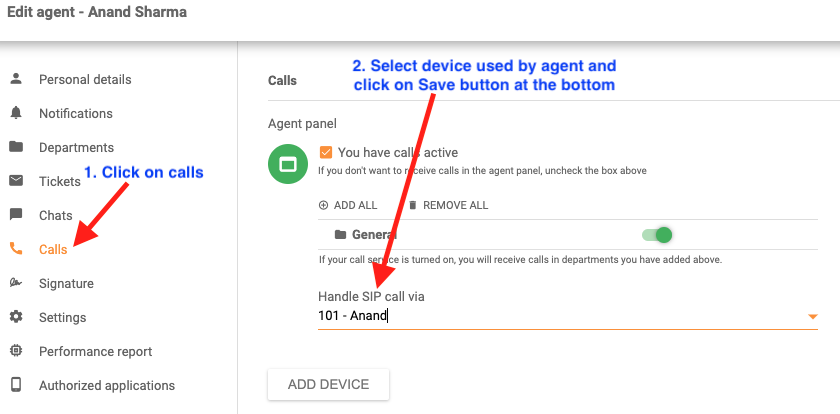
- On the edit agent screen, click on “Calls” and then select the “device” used by the agent to “Handle the SIP Calls”. Click on save button to save the updates.
SIP Device assigned to agent
- Test the setup by making and receiving some test calls using your DoorVaani.com phone number. You can get multiple Phone Numbers from DoorVaani.com and also multiple VOIP Lines (SIP Trunks) as per your needs. You can also have multiple inbound and outbound channels – so that more than one call (Inbound or outbound) can be simultaneously made through your VOIP Lines (SIP Trunks). If you have more than one Phone Number from us, you may want to use our “BestMatch” CallerID feature – which dynamically assigns the best CallerID in real-time based on the destination you have called.