


Progressive organisations want to use CRM solutions for efficiently managing their customer interactions. It will be a lot more convenient for sales and marketing personnel when cloud telephony service is integrated with the cloud CRM they use. DoorVaani cloud telephony service readily integrates with one such (among others) cloud based popular CRM called LeadSquared. This article explains how to use DoorVaani as an integrated service within your LeadSquared CRM account.
DoorVaani has developed a very easy to use API that works with “Universal Telephony Connector” of LeadSquared CRM. You can set up this “Universal Telephony Connector” to work with your DoorVaani account within a few minutes. Please follow the steps given below to get this done:
- In addition to a LeadSquared CRM account with admin level access, you need a DoorVaani account to start with and if you don’t have one yet, you can register your account for free at https://doorvaani.com/register
- You need at least one VOIP Line (a.k.a. SIP Account) in your DoorVaani account. If you don’t have a VOIP Line, please refer to http://doorvaani.com/blog/how-to-create-a-voip-line/ and create one. To place outbound calls, you would need a positive talk-time balance on your VOIP Line. Please refer to http://doorvaani.com/blog/how-to-add-talk-time-balance/ for information on adding talk-time balance to your VOIP Line.
- Finally you need at least one DID Local Phone Number or Toll-free phone number in your DoorVaani.com account. To get a Phone Number, please use “MY PHONE NUMBERS > Buy Phone Numbers” menu accessible from the left hand side in your DoorVaani.com account.
- DoorVaani.com will give you a unique CRM UserID and a API Secret key that you would need to enter in your LeadSquared “Universal Telephony Connector” settings screen. Please e-mail us on support@doorvaani.com to get your CRM UserID and API Secret Key. In your E-mail request please include your LeadSquared API Host, Access Key and Secret Key. Please refer to the screen shots in #20 below for information on how to get these three values. In the e-mail request also share your Call Route API – Lead Route V2 URL, Agent Popup API URL and Call Log API URL Please refer to the screen shots in #21 below for information on how to get these three URLs. Please ensure you e-mail us through your DoorVaani.com registered login e-mail id. You must protect your API Secret Key and should not share it with anyone else. Just in case your API Secret Key is compromised, please immediately inform us and get a new API Secret Key from us.
- Ensure that a) The country/countries you want to call is/are added to your DoorVaani.com “MY DASHBOARAD > Outgoing Call Countries” menu accessible from left-hand side.
- Once you have all of the above, please login into your LeadSquared account with admin privileges and click on “Apps > Apps Market Place” from the main menu in the top.

LeadSquared Apps Marketplace
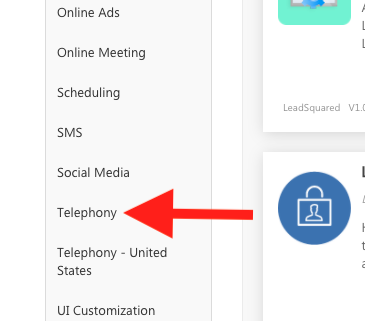
- In the LeadSquared Apps Market Place screen, please click on “Telephony” menu from the left hand side.
LeadSquared Telephony Menu
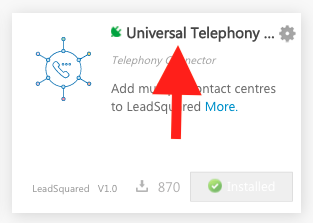
- Click on “Universal Telephony Connector” tile.
LeadSquared Universal Telephony Connector
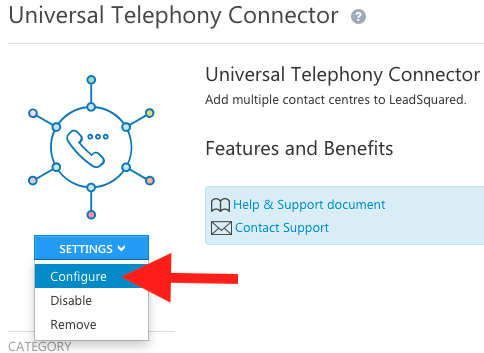
- In the “Universal Telephony Connector” screen, mouse over the “SETTINGS” drop-down and then click on “Configure”. If not yet installed, you may need to “install” the Universal Telephony Connector before you can see the “SETTINGS” drop-down menu.
Configure LeadSquared Universal Telephony Connector
- In the “Configure Universal Telephony Connector” popup, please click on the “+” sign in the top right to add a new connector.

LeadSquared Add Virtual Number
- In the “Add Connector” screen, please select “Connector Type” as “LeadSquared Generic Telephony Connector” and you may name it as “DoorVaani” or any other name of your choice.
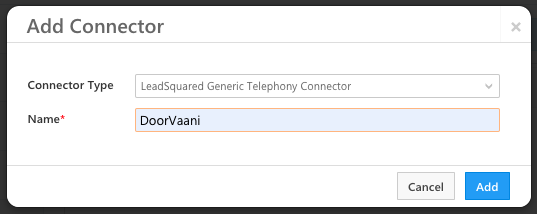
LeadSquared Add Connector Screen
- On the DoorVaani connector tab, click on “Virtual Numbers” from the left hand side and then click on the “Add” button and then enter your DoorVaani.com DID Local Phone Number or Toll-free number and enter an identifier name like “DoorVaani Number”. Please refer to #3 above for full details on how to get a DoorVaani.com Local/Toll-free phone number.
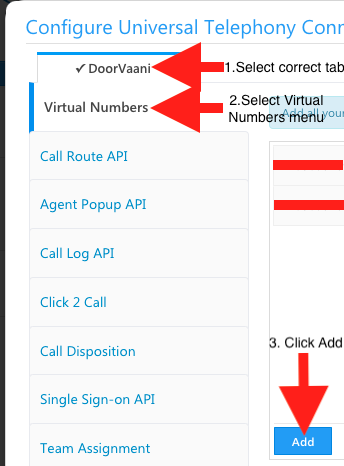
Add DoorVaani Virtual Number in LeadSquared
If you have any changes in your virtual numbers you can also edit them by clicking on the edit icon as shown below.
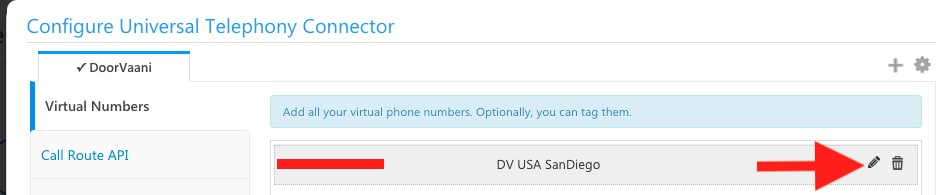
DoorVaani Virtual Numbers Edit
- Now click on “Agent Popup API” from the left hand side, click on the “Enable” check box to “enabled on” and then click on the “Save” button.
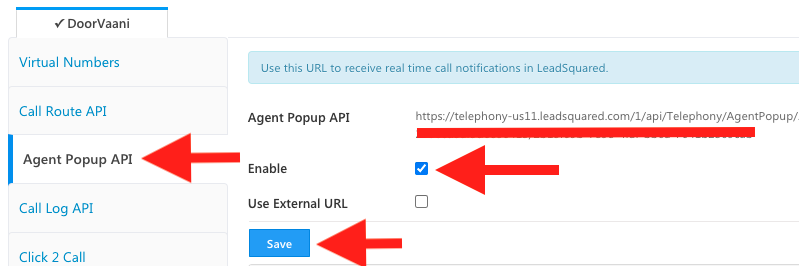
LeadSquared Agent Popup API Settings
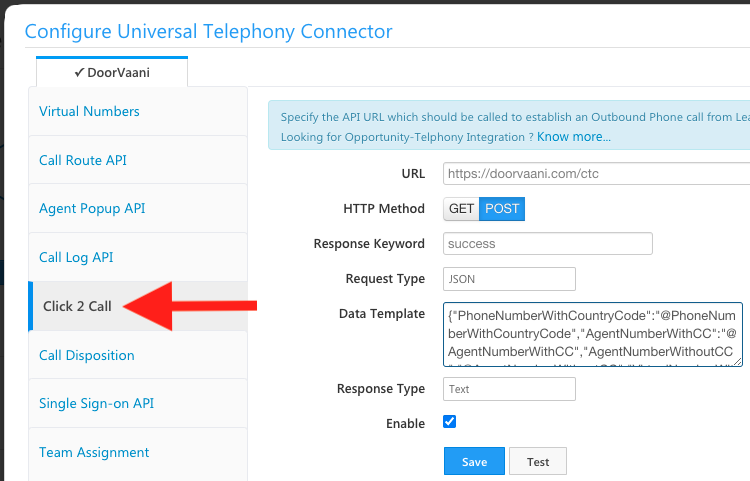
- Now click on “Click 2 Call” from the left hand side and please enter in the various inputs as given here (refer to the screen shot below): a)URL as https://doorvaani.com/ctc , b) HTTP Method as Post, c) Response keyword as “success” (without the quotes and all in lowercase letters), d) Request Type as JSON, e) Response Type as Text, f) Enable check box as “enabled on” and g) Data Template as in the following (including the curly braces) and replace the values of the last two parameters i.e. dv_api_key and dv_crm_user_id as received by you from DoorVaani (please refer to #4 above to get these values) and save your updates: {“PhoneNumberWithCountryCode”:”@PhoneNumberWithCountryCode”,”AgentNumberWithCC”:”@AgentNumberWithCC”,”AgentNumberWithoutCC”:”@AgentNumberWithoutCC”,”VirtualNumberWithoutCC”:”@VirtualNumberWithoutCC”,”VirtualNumberWithCC”:”@VirtualNumberWithCC”,”leadId”:”@leadId”,”leadPhone”:”@leadPhone”,”agentName”:”@agentName”,”agentEmail”:”@agentEmail”,“dv_api_key”:”*********“,”dv_crm_user_id”:”n“}
LeadSquared Click 2 Call Settings
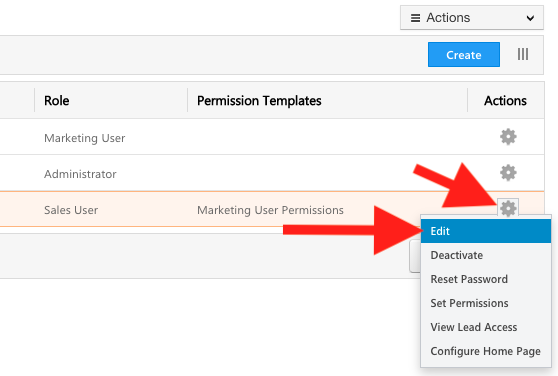
- Now go to “Manage Users” screen of your LeadSquared account and do these edits (click on the settings gear wheel of the respective user and select Edit) to the CRM user (Repeat for all of your CRM users):
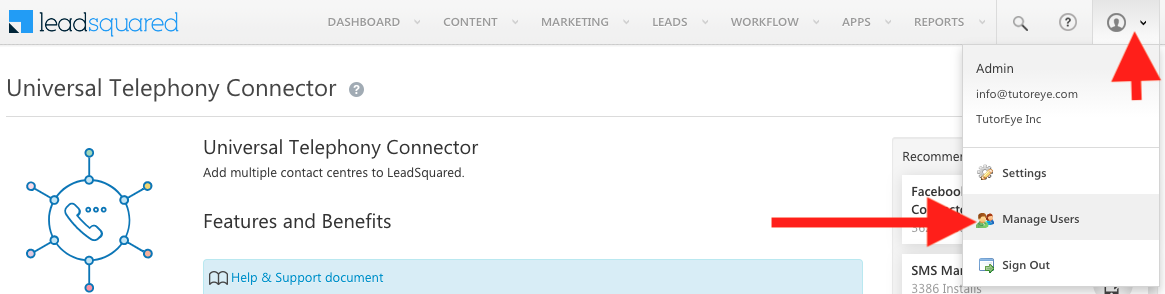
LeadSquared Manage Users Menu
-
LeadSquared Edit User Menu
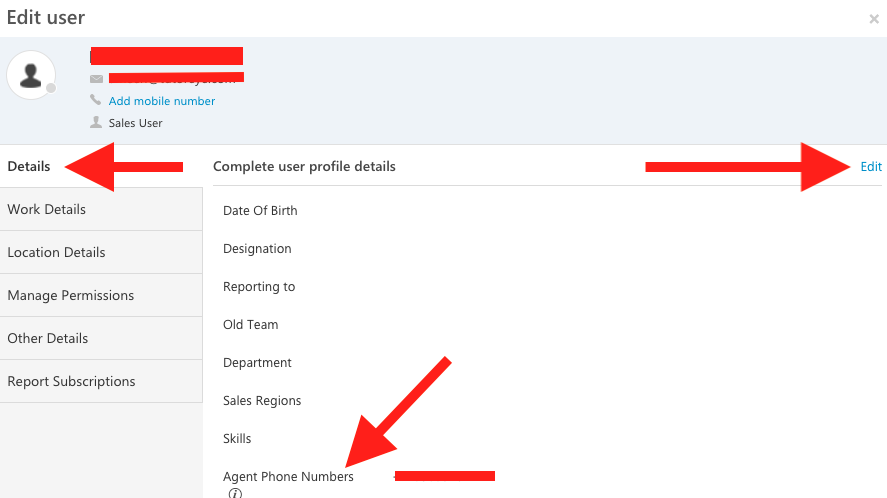
a) Edit User > Details : Agent Phone Numbers – Please enter the DID / Toll-free number you have bought from DoorVaani.com (LeadSquared CRM requires every user/agent to have a unique Phone Number).
LeadSquared Edit Agent Phone Number
b) Edit User > Other Details: Telephony Agent Id : Please enter your DoorVaani.com VOIP Line username as your Telephony Agent Id (exactly same as you have in your DoorVaani.com account and it is case sensitive), Each one of your agents must have his/her own unique telephony agent id – You can get as many VOIP Line user Ids as you need from your DoorVaani.com account c) Show Phone Call Popup: Yes . Ensure you save your updates.
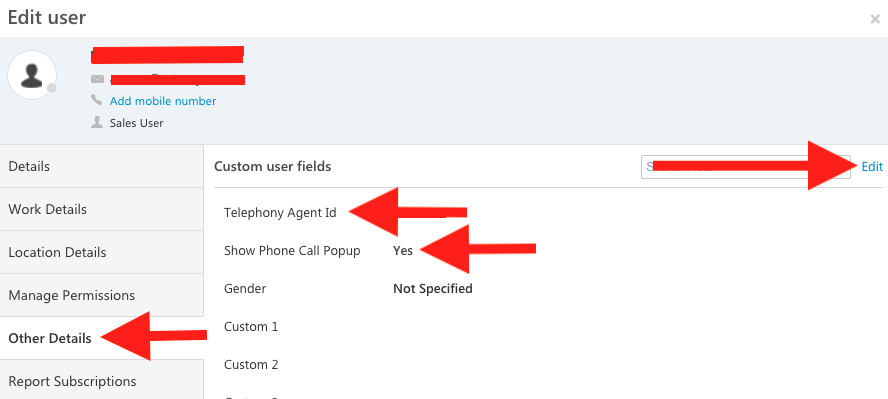
LeadSquared Edit User Other Details
- Now you can click on your lead phone numbers to place outbound calls, optionally fill in the popup page that comes up for both inbound and outbound calls (see screen shots of agent popups below) and see your calls log within your CRM admin area by going to “Settings > API and Webhooks > Telephony Logs”. When you click on a lead phone number to place outbound call, you may see a message asking for your confirmation. Just in case you do not want to see the confirmation message you can disable it by selecting “No” to “Show Phone Call Popup” in Edit User>Other Details screen as shown above in #16(b) screen shot.
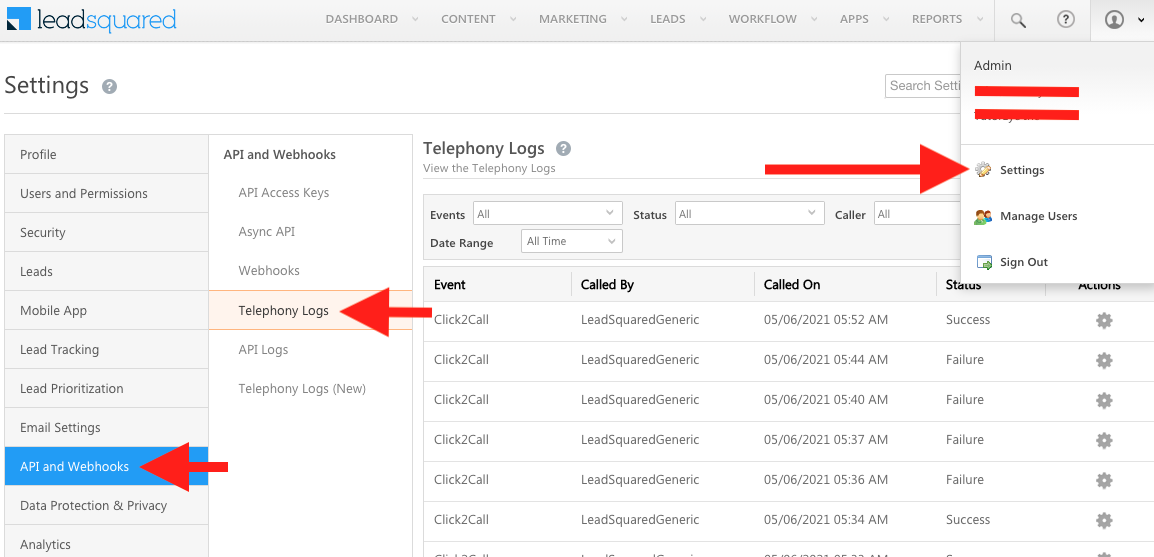
LeadSquared Telephony Logs
- When a lead phone number is clicked in LeadSquared CRM, you will first receive an inbound call (ensure your VOIP Line is registered to our SIP server through your device like soft-phone/IP Phone/IP-PBX etc) and on answering that inbound call by you/your agent, the outbound leg of the call towards your lead will be automatically placed by DoorVaani. When your outbound call is answered by your call recipient, you will see a pop-up in your CRM as shown below. Optionally you can enter information about your lead and about the conversation during your call in the popup and click on the save icon in the popup. Just in case you do not want to see the agent popup, you can disable it by “unchecking” the “Enable” check box in the Universal Telephony Connector Settings > Agent Popup API – please refer to #13 above for the screenshot.
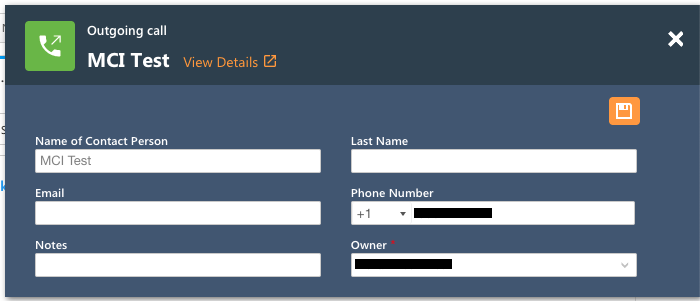
Lead Squared CRM Outgoing Call Popup
- When you get an inbound call, you will see the pop-up in your CRM as shown below. Optionally you can enter information about the caller and the conversation you had in your call and click on the save icon. Just in case you do not want to see the agent popup, you can disable it by “unchecking” the “Enable” check box in the Universal Telephony Connector Settings > Agent Popup API – please refer to #13 above for the screenshot.
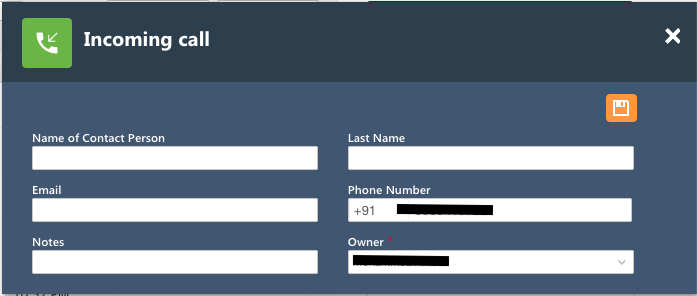
Lead Squared CRM Incoming Call Popup
- You must share your LeadSquared API Host, API Access Key and Secret Key with us (in your e-mail request as in #4 above to DoorVaani for CRM UserID and Secret Key) before we can generate your Unique CRM UserID and DoorVaani API Secret Key. Please refer to the steps shown in the screen shots below to see how to get these values to share with us. If you don’t see any Access keys, please click on “Generate Key” button to generate a new pair of Access Key and Secret Key.

LeadSquared API Keys Menu
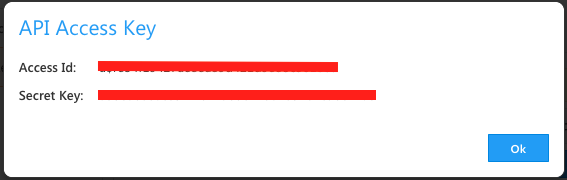
LeadSquared API Access Key and Secret Key
- In addition to the above three values as shown in #20 above, please include following three URLs (in your e-mail request as in #4 above to DoorVaani for CRM UserID and Secret Key) from your LeadSquared Telephony Connector Settings (Accessible from LeadSquared menu: Apps > Apps Marketplace > Telephony > Universal Telephony Connector > Settings > Configure): a) Call Route API – Lead Route V2 URL, b) Agent Popup API URL and c) Call Log API URL. Please refer to the screen shots below for information on where to get these three URLs
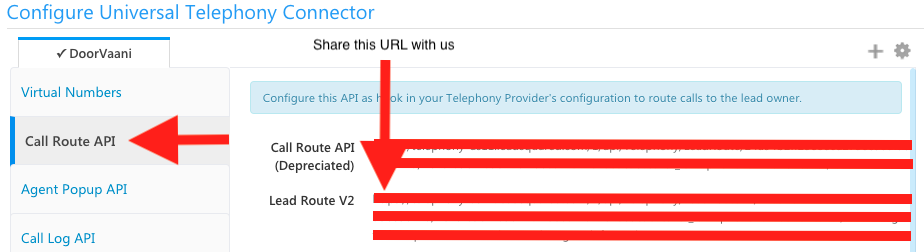
LeadSquared Call Route API URL (Lead Route V2)
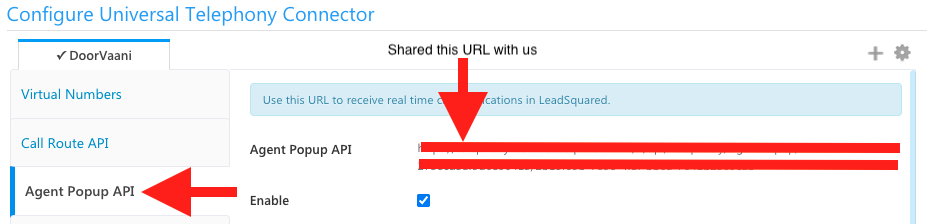
LeadSquared Agent Popup API URL
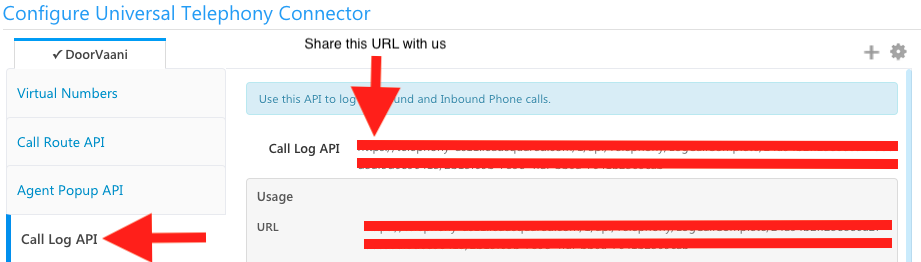
LeadSquared Call Log API URL