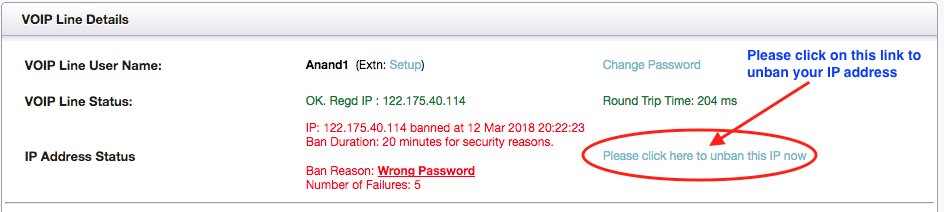
If too many failures in registering your VOIP Line to DoorVaani server occur in a very short period of time, then, as a security measure, your IP Address will be banned from accessing our server for 20 minutes each time such an incident happens. The most common failures, that end up in banning your IP address, are of the following types:
1. Incorrect VOIP Line Password (Note: Password is case sensitive).
2. Auth Name mismatch with Username (Auth name must be either blank or exactly same as your VOIP Line username and is case sensitive).
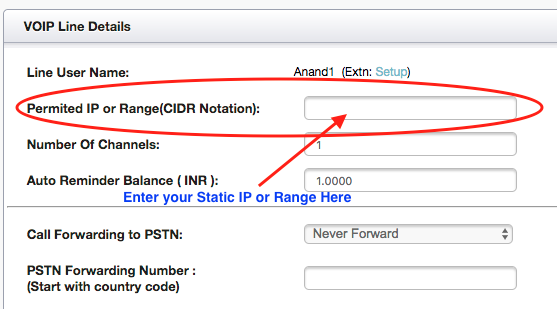
3. Not registering your VOIP Line from the “Permitted IP or Range” as saved by you.
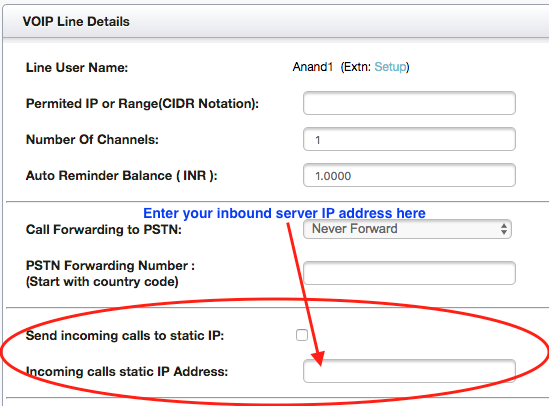
4. Registering the VOIP Line, which is not supposed to be registered, as it is set by you to send inbound calls to your Static IP.
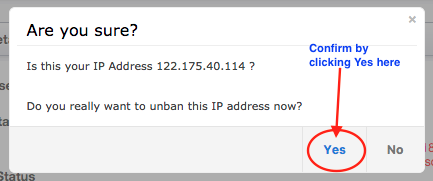
If your IP Address is banned for any of the above reasons or for any other reason, you will be immediately notified by e-mail that includes what exactly the problem is and how to overcome it. Please pay attention to the contents of these e-mails as it will contain valuable information on how to overcome the problem that is causing this issue. Similarly when your IP Address gets automatically unbanned at the end of the 20 minutes interval, you will receive another e-mail informing you of this unban action. If you do not want to wait for 20 minutes for the IP Address to be unbanned, you can manually unban it immediately. Please refer to this blog article on how to manually Unban your IP address.
Regarding the e-mails that are sent out by our server, you can have the following two preferences:
1. Just in case you do not want to receive these E-mail alerts, you can unsubscribe from these e-mails.
2. If you want to receive these e-mail alerts on a different e-mail id, you can change the E-mail id in your DoorVaani account.
Please Note: Before you take any action, please ensure that the IP Address shown in the E-mail you received is really your IP Address. You can see what your IP Address is, by going to a service like www.WhatIsMyIP.com. If the banned IP address is not your IP Address, it indicates someone else is trying to misuse your account or steal your credit. Please contact us immediately if this is the case so that we can help you secure your account.
The rest of this blog post explains how to set up your e-mail preferences.
How to unsubscribe from these E-mail alerts?
1. Login into your DoorVaani account.
2. Go to “VOIP Line Details” page, by clicking on your VOIP Line username in the “My VOIP Lines” page.
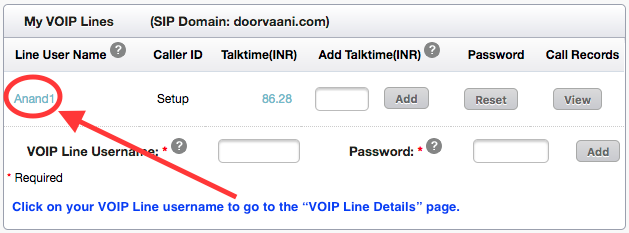
VOIP Line username
3. Locate the “Send IP Address Bannned/Unbanned emails:” section at the bottom of the “VOIP Line Details” page.

IP Address Banned or Unbanned Email Preferences
4. Uncheck the “Send IP Address Banned/Unbanned emails” check box and submit the page.
How to change the E-mail ID for these alerts?
1. Login into your DoorVaani account.
2. Go to “VOIP Line Details” page, by clicking on your VOIP Line username in the “My VOIP Lines” page.
3. Locate the “Send IP Address Bannned/Unbanned emails:” section at the bottom of the “VOIP Line Details” page.
4. Check the check box, enter your desired E-mail ID in the input box labeled “Email ID for IP Address Banned/Unbanned” below the check box and submit the page. Please refer to the images above for the full details.