


Each of the VOIP Lines in your DoorVaani account comes with its own voice mail box. Your callers have the option of leaving you a voice mail message in the event you are unavailable to take the call or busy on other phone lines. This blog post explains how to make the best use of your voice mail.
How to access voice mail setup options page?
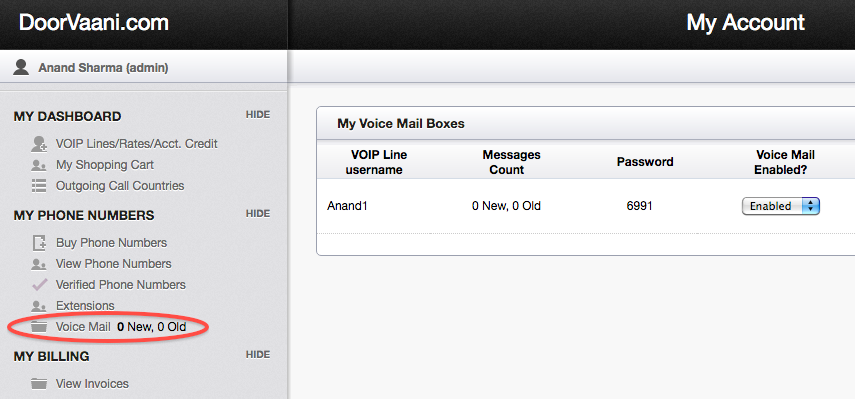
Voice Mail settings page menu
Please login into your DoorVaani account and then click on the “Voice Mail” menu as shown in the above image.
How do I know my voice mail password?
Voice mail box is automatically created when you create your VOIP Line. You would need a password to enter your voice mail box to listen to your messages or to administer your voice mail options. A four digit numeric password is created when your mail box gets created. You can see this password that was created for you on the “Voice Mail” settings page.
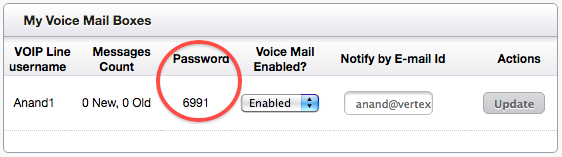
Voice Mail password shown on the Voice Mail settings page.
Just in case you do not want to have the Voice Mail service on your VOIP Line you can simply “disable” it by selecting “Disabled” in the “Voice Mail Enabled?” drop-down box. Please see the image above.
When a new voice mail message arrives in your voice mail box, you will be email notified on the email id that is set up in the “Notify by E-mail Id” input box. By default this email id is set-up same as your DoorVaani account login e-mail id. You have the option of changing this email id as per your needs. Just in case you do not want to be email notified simply blank out this email id input box and then hit the update button.
How to listen to the Voice Mail messages?
There are two ways to login into your voice mail box and listen to your voice mail messages.
- From the device you use to make and receive phone calls – registered to DoorVaani server
- From any other phone not in DoorVaani network – you would need a DID Number to use this option
From your device, registered in DoorVaani network, you can dial your own extension number or your own DID Number if you have one, or your alpha-numeric VOIP Line username. If you have not yet associated an easy to use extension number to your VOIP Line you can do so now by visiting the extensions page accessible from the left side menu. Once your call is connected you will be prompted to enter your voice mail password. On successful login you can follow the menu options read out to you and listen to your voice mail messages.
If you have a DID Number, you can call your DID Number from any other network or from PSTN and while your voice mail greeting is playing, you should enter ‘*’ (star key) to hear the password prompt. After entering the correct password you will be presented with the same voice menu options as above and you can listen to your voice mail messages.
How to record custom greeting messages?
You can record your own custom greeting messages, one for unavailable status and one for busy status. While in your voice mail box, please select option 0 (zero) for Mailbox Options and then select option 1 to record your ‘unavailable’ greetings message and option 2 to record your ‘busy’ greetings message. You can also record your name by selecting option 3.
If you have not recorded your unavailable greeting or busy greeting but have recorded your name, the voice mail system will play a generic message: “Recorded name is not available.” or “Recorded name is on the phone.” as appropriate.
If you have not recorded your unavailable greeting or busy greeting and have not recorded your name, the voice mail system will play a generic message:“The person at extension is unavailable.” or “The person at extension is on the phone.”
How to change my voicemail box password?
Login into your voice mail box using your current password and then select option o (zero) for Mailbox Options followed by option 5 for changing your password.
What is temporary greeting?
You can record a temporary greeting and if it exists, it will always be played instead of your “busy” or “unavailable” greetings. This could be used, for example, if you are going on vacation or will be out of the office for a while and want to inform people not to expect a return call anytime soon. Using a temporary greeting avoids having to change your normal unavailable greeting when you leave and when you come back. To record a temporary greeting, please select option 0 (zero), then option 4.
After you return to the office, the temporary greeting should be erased. The voice mail system presents different menu options when a temporary greeting is set. Log into your mailbox, then press 0, 4 for the temporary greeting menu.
- (Re)-record your temporary message.
- Erase your temporary greeting.
Organizing voice messages into folders:
DoorVaani voice mail system allows you to save and organize your messages into the following folders:
0 : New messages
1: Old messages
2: Work messages
3: Family messages
4: Friends messages
Options after Recording a Message:
If the caller pressed the # button to end the recording, the caller will be presented with the following options:
1: Accept this recording
2: Listen to the recording
3: Re-record the message
Recommended configuration after first time login:
The first time that you log into your mailbox, you should configure your personal mailbox options. These include:
- Recording your name.
- Recording your unavailable greeting.
- Recording your busy greeting, if desired.
- Changing your password.
Voice Mail Menus:
Main menu: The main menu will be the first menu you hear when you have logged in. Here are the main menu options:
1. Listen to new messages (the default) or listen to old messages if there are no new messages.
2. Change folders.
3. Advanced options.
0 (zero) Mailbox options (see below).
* Help (repeat the menu options).
# Exit from the voice mail system.
Mailbox Options in the Main Menu: Pressing 0 (zero) from the main menu will present the mailbox options menu.
1 Record your unavailable message.
2 Record your busy message.
3 Record your name.
4 Record your temporary greeting.
5 Change your password.
* Return to the main menu.
The Message Envelope:
The message envelope is a recording listing details about the message. This consists of:
- The position of the message in your list of messages
- The date and time that the message was received
- Caller ID information
- The duration of the message
After Message Playback:
After the message has been played back, the system will play a prompt and wait for you to press a button:
1 Go to the first message in the current folder.
2 Change folders.
3 Advanced options.
4 Go to the previous message in the folder.
5 Repeat the current message.
6 Go to the next message in the folder (this will only be offered if there is another message).
7 Delete or undelete the message (only if it was just deleted in the current session).
8 Forward the message to another user.
9 Save this message in another folder (you will be asked which folder to use).
0 Mailbox options (see “Mailbox Options in the Main Menu”, above).
* Help (repeat the menu options)
# Exit the voice mail system.
This prompt will repeat after a short pause if no key is pressed.