Author Archives: DoorVaani

About DoorVaani

Founder and owner of DoorVaani.com.

VOIP Number use cases

VOIP Numbers, also known as Virtual Phone Numbers and DID (Direct Inward Dialling) Phone Numbers are being extensively used by both businesses (large and small) and individuals as they offer the best features at low prices for the following use cases. The use cases given below are as seen by DoorVaani.com over a long period of time. Many of the requirements of these use cases are met only by a VOIP Number but not by a conventional phone number like landline phone number or mobile phone number.

If you or your business has a similar requirement, you should register your account for free with us and then you can immediately start using our services including buying and using one or more VOIP Numbers.

1. Virtual Presence in a different country or territory

Unlike traditional phone line, VOIP line is not tied up with a physical location so it can be used anywhere you have access to broadband Internet. As businesses want to stay competitive and are looking to cut costs and/or seeking better services, they want to shift their operations to low cost locations often to a different country or territory. In such a case customers or those businesses don’t have to call an International number but simply a VOIP Number local to them resulting in higher levels of customer satisfaction and higher levels of credibility.

VOIP Number Virtual Presense

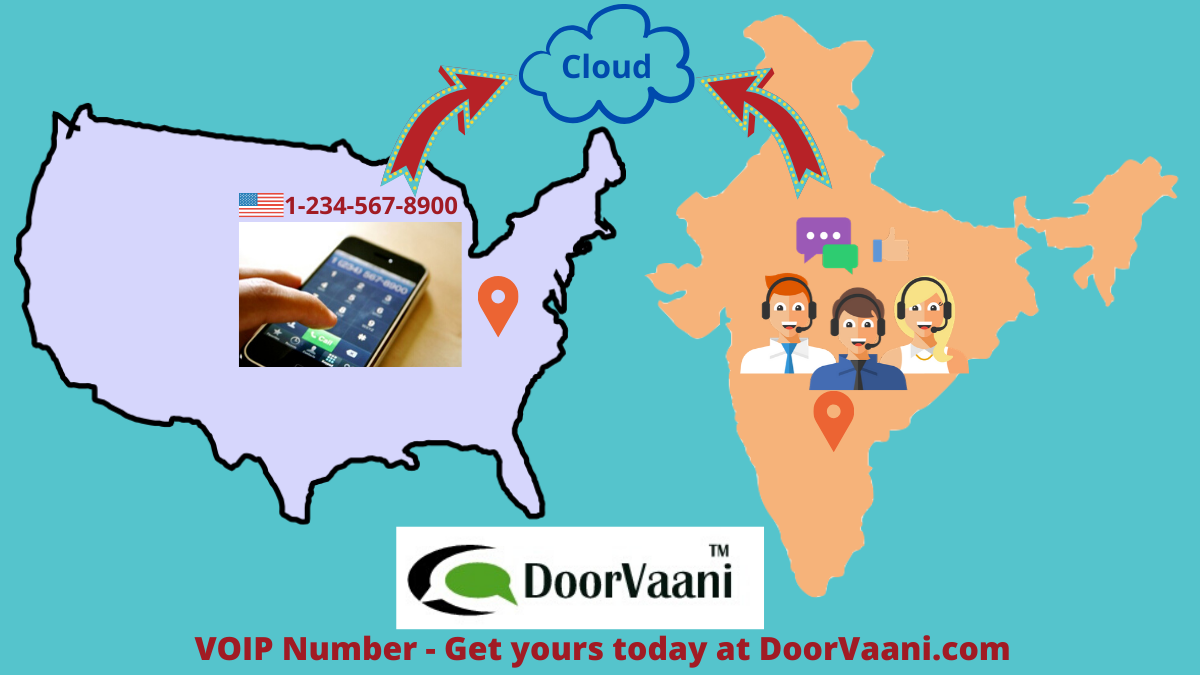
VOIP Number Virtual Presence

2. User mobility across geographies

Users of VOIP Numbers can freely move across geographical locations like to a different country or territory and still won’t be missing their inbound calls as long as they are connected to the Internet. Mobile numbers offer some limited amount of mobility through “roaming” service but it would be very expensive, if not prohibitive, if you want International roaming to be available to you. Users of VOIP Numbers can use their smart mobile phones (through freely downloadable mobile apps) to make and receive VOIP Calls even while they are on the move provided they have Internet access.

VOIP Number Get Inbound Calls Anywhere

VOIP Number Get Inbound Calls Anywhere

3. Use in areas not served by traditional landlines and/or mobile service providers

As cities and population centres are becoming over crowded, these are bound to expand outwards into new areas along the existing peripheries of these cities. It has now become a fact that these newly developed areas get access to broadband Internet even before any traditional phone services providers or even mobile services providers reach those areas to provide their services. VOIP Number and VOIP services come to the rescue of such users in these areas. It is no longer surprising that these new areas may never get traditional phone line services as those providers will not be able to compete with low cost VOIP Service providers.

4. High volume concurrent calls

Fast growing businesses will often need to make and/or receive a very high number of concurrent calls in situations like sudden splurge in demand or during the new product or service launch promotion events etc., VOIP Service providers can instantly scale up to the needs of such businesses without charging them any extra fees or asking them for long term commitments.

5. Reduce and/or eliminate hardware devices used in communications

Owning and maintaining multiple hardware devices for voice communications is not only expensive but creates a lot of clutter in your work space. VOIP Number enables you to use your existing devices like your desk computer or your smart mobile phone for your voice communications. For those of you who want to use dedicated hardware desk phone (I agree that it has its own advantages over the soft-phones), you can still reduce the number of hardware phones to just one by using VOIP while you can still have any number of VOIP Numbers, possibly of multiple countries, sending your inbound calls to the same device.

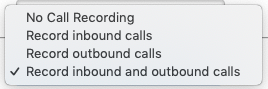
6. Advanced call features

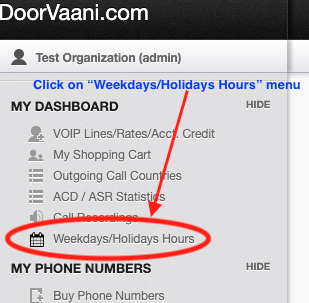
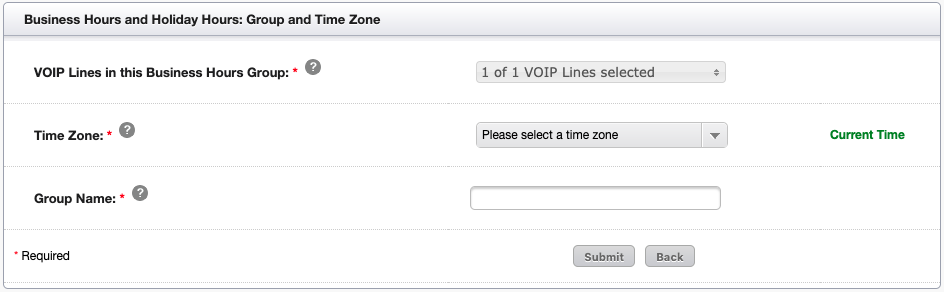
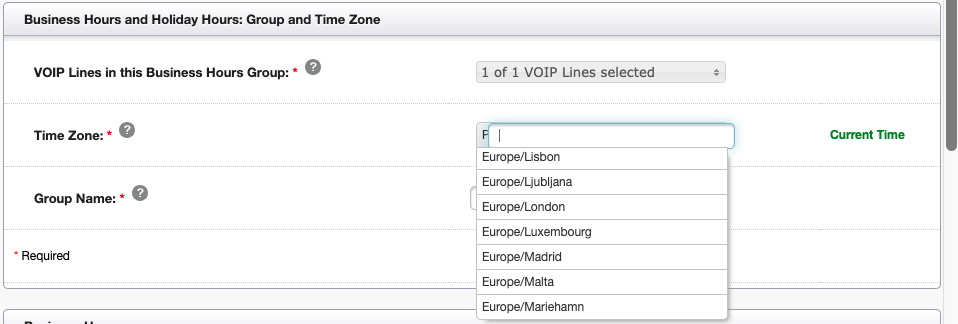
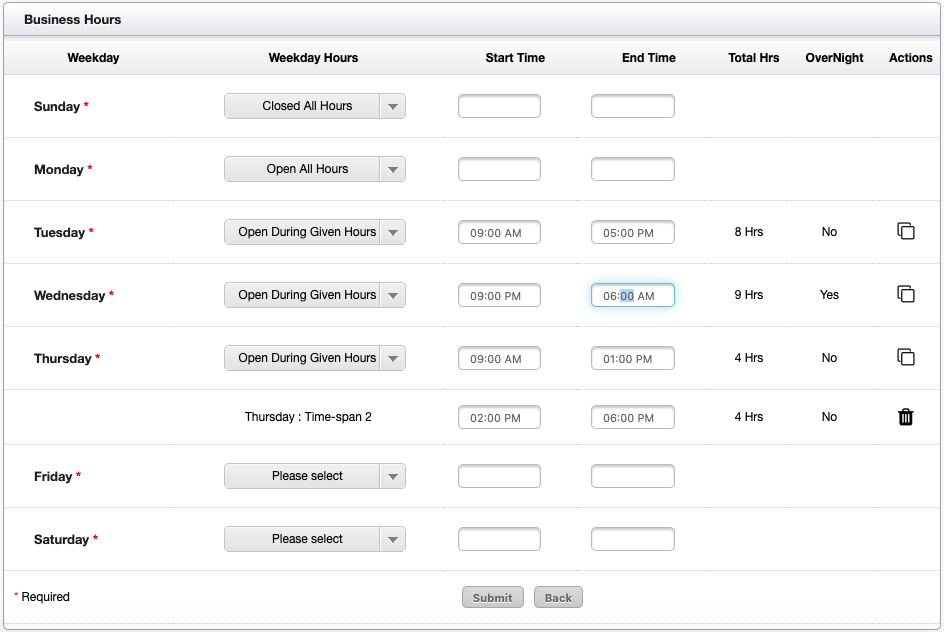
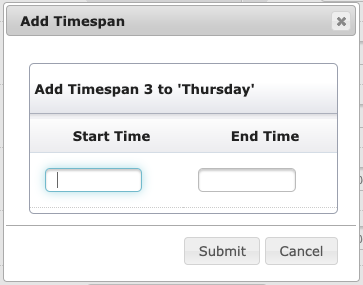
VOIP Numbers offer many advanced features which are generally not available in conventional phone numbers. One such example of the advanced features offered by DoorVaani VOIP Numbers is “User defined work hours and holiday work hours” based inbound call routing.

7. Network Convergence

Enterprises that are looking to converge their voice and data networks should be switching over to standards based VOIP Service providers. Each one of the employees of these enterprises can have their own dedicated VOIP Number while still be able to make free internal calls, even across geographies, by dialling short extension numbers.

Conclusion

Switching over to VOIP for your voice communication needs almost always results in significant savings in costs while providing higher levels of call quality and feature rich solutions to your voice calling needs. You do not have to be a large company or heavy user to take advantage of these services and savings. Both occasional users and heavy users can reap the benefits alike.

You may also be interested in the following information:

How to get USA Mobile Phone Number for use in creating FAFSA ID: http://doorvaani.com/blog/how-to-get-us-mobile-phone-number-for-use-in-creating-fafsa-id/

Call Recordings on DoorVaani servers


Call Recording

Call Recording

DoorVaani provides a very high quality hosted calls recording service that runs on our cloud servers and can be used by both businesses and individuals alike. This is a subscription based service and is priced on a very low per recorded minute basis. All of your call recordings will be done on our secure servers and will be stored on our servers for a maximum period of 30 days from the recording date. You can listen to your call recordings directly from our servers in your DoorVaani.com account and also download your call recordings using our very high powered and full featured call recordings download tools. This blog post discusses how to enable call recordings service in your account and how to effectively use it.

Call Recordings can be enabled in your DoorVaani account on a per username basis. You can also enable call recordings only for inbound calls, only for outbound calls or for both inbound and outbound calls. Additionally DoorVaani provides advanced call recording features like “On Demand” call recording and “Stop Recording” during a call and then “Restart a stopped recording” during the call. If you don’t want to record some sensitive part of the call, for example while taking the credit card number of your customer, you can briefly stop the recording and restart it when you need it. The admin user can also control whether or not to make the “Stop and Restart Call recording” feature available to your users. Voice of all parties in the call is recorded in one file for each call. The best part is you will be charged only for the actual number of recorded call minutes which could be potentially much less than the call duration. Call recordings are available for your review and download immediately after the completion of the call.

Before enabling the call recordings in your account, you should ensure that you follow your local laws if any that control or regulate the recording of calls. Please consult your own legal counsel as we cannot provide you with any legal advice.

How to enable Call Recording in your account?

Please login into your account or if you are already logged in, please click on “MY DASHBOARD > VOIP Lines / Rates / Acct. Credit” menu from the left hand side to be taken to your “My VOIP Lines” page.

VOIP Lines / Rates / Acct. Credit menu

Menu item to click on to reach “My VOIP Lines” page.

From “My VOIP Lines” page, please click on your desired VOIP Line username to go to the “VOIP Line Details page”.

ClickOnUsername

Once you are on the “VOIP Line Details” page, you will see two drop-down boxes in the Call recordings area, one for selecting which calls to record (Inbound or Outbound or Both Inbound and Outbound) and the other one is for enabling the “Stop and Restart” call recordings during the call. Please select the options as per your needs and then submit your updates.

call recording options

Call Recording Options

call recording options down down

The following special sequence of keys are to be pressed during the call to use the advanced features like “On Demand” Call Recording, Stop Call Recording and Start Call Recording during the call:

  • Press #11 for On Demand Call Recording
  • Press #12 to Stop Call Recording
  • Press #13 to Restart Call Recording

You will be shown the per minute call recording rate applicable to you and also the number of days your call recordings will be stored on our server. You must download your call recordings within the given number of days as the call recordings will be deleted and will not be available on our servers beyond this period in any circumstances without any exceptions.

How to listen to your call recordings in your DoorVaani account?

To access your call recordings and to listen to them online, please click on “Call Recordings” menu item under MY DASHBOARD from the left hand side.

callrecordingsmenu

You can filter your call recordings shown on the page by i) username ii) start date iii) end date iv) Called Number / Caller ID – one or more of these filters or by all of them. These filters are provided in the top of the call recordings page.

callrecordingpage

Call Recordings Page

You can listen to the call recording for a limited number of times using the audio controls on the page. A total of 5 transfers, that includes the number of times you listen to a recording plus the number of times you download the recording, are allowed. The last transfer (5th one) must be a download.

How to download call recordings?

There are three different ways you can download your call recordings – that suits different needs.

Call Rec Download Buttons

Call Recordings Download Buttons

i) Click on the download icon on each of the call recording to just download that one single file.

ii) Check multiple call recordings using the check box on each call recording row and then click on “Download Checked” button in the bottom of the page. This way you can download multiple files in “one go” that are shown on the “one” Call Recordings page.

iii) “Download New” button – to download all the call recordings that were never downloaded before. A maximum of 1,000 call recordings or a maximum total of 500 MB of call recordings can be download in one go. If you have more than the above number of “New” call recordings, then you can download them through this button by using it as many times as needed. You must be reloading the page between each download using the “Reload” button. “Download New” files button will be visible only when there are new recordings that can be downloaded are available.

It is advisable to download all of your new call recordings everyday by using the “Download New Call Recordings” button. All of the file names in the call recordings are unique so you can always store them in one folder without overwriting any of the previously downloaded files.

A call recordings download log is saved and maintained on our servers for you to see the full details of your downloads.

Call Recordings Download Log:

Call Recording Downloads Log

Call Recording Downloads Log

The Call recordings downloads log contains information regarding each one of your downloads, that includes the date and time of the download, which button was used to do the download, your ip address from which files were download, number of call recordings in the download, total files size, details of filters (username, start date, end date and Caller ID or Called Number) if any were used, and also the zip file name that was downloaded and the manifest filename that was included in the zip file downloaded.

From the call recordings page, for those files that were already downloaded, you can see the full details of the download by clicking on the ellipses icon by the side of the downloaded date / time (please see the below image). This is a very useful feature, since after download (even after 30 days and your call recordings were deleted from DoorVaani server) you will still be easily able to find the zip file in which the particular call recording was downloaded.

Access Download details

Accessing Call Recording Download Details

Call rec download details

Call Recording Download Details page

Contents of the downloaded zip file:

All downloads will be in a zip file format with a unique name for each downloaded zip file. You can safely put all of your downloaded zip files in one folder without worrying for overwriting any old files of the same name. The zip file contains all the selected call recordings with unique file name for each of the recordings. You can always unzip the downloaded zip files in the same folder without worrying for overwriting any of the pre-existing files in the folder.

The downloaded zip file, in addition to the call recordings files, contains a “manifest” file that is in CSV format. This manifest file contains all of the downloaded files details. The purpose of the manifest file is to use it at your end to build a database of your call recordings at your end which can be used to create a web page of call recordings at your end. The first row of manifest CSV file contains the column headers. The columns in the manifest file, in this order are: Recorded Date and Time, Line Username, Call Direction, Called Number / Caller ID, Duration in Seconds, File Name, File Size in bytes and File Extension. The Call Direction can be IN (for inbound calls) or OUT (for outbound calls). The next column, Called Number / Caller ID depends on the call direction (Called Number for outbound calls and Caller ID for inbound calls).

The downloaded zip file also contains a simple HTML file that can be opened in your web-browser and then you can instantly listen to your call recordings from your local computer and local browser from this html file – which does not use your internet connection.

Call Recordings HTML File

Call Recordings HTML File

Weekdays and Holidays Work Hours

Outside of your working hours, you may want your callers to leave you voicemail messages directly without ringing your devices. In your DoorVaani account, you can enter your annual holidays and whether or not you work on those holidays. You can specify your Sunday to Saturday weekday work hours as well as your holidays work hours if any. Any inbound calls that comes to you outside of the working hours set by you will land straight into your voicemail. To access this page, please click on “MY DASHBOARD > Weekdays/Holidays Hours” menu from the left hand side as shown in the figure below.

Weekdays/Holidays Hours Menu

Weekdays/Holidays Hours Menu

Please ensure that you have one or more VOIP Lines created in your account before you try to setup your Weekdays/Holidays hours. If you do not have any VOIP Lines created in your account, you will see a page asking you to create a VOIP Line.

No VOIP Lines Found page

No VOIP Line Found page

If you have multiple VOIP Lines in your account, you can create “groups” of your VOIP Lines, and have the Weekdays/Holidays hours set up by you applicable to all those VOIP Lines in the group. If you have only one VOIP Line, a group of just one VOIP Line is auto created by the system for you. You can also select a Timezone and then enter all of your hours in the selected timezone. Enter any group name of your choice for your easy identification of groups. DoorVaani system auto suggests the group name based on the timezone you select which can be changed by you.

Auto Group of only one VOIP Line

Auto Group of only one VOIP Line

Please select the timezone in which the group works. If you have multiple teams each working in a different timezone then you can create as many groups as the teams you have and then select the timezone for each one of your groups. Once you select a timezone, the current time of the selected timezone will be shown to you. Ensure that you submit your selections to save your group/timezone information.

Select A Time Zone

Select A Time Zone

In the “Weekday Hours” and “Holiday Hours” sections, you can choose one of the three options for the work hours: 1. Closed All Hours, 2. Open All Hours and 3. Open during given hours as applicable to you. If you select the 3rd option “Open during given hours” you can enter your “Start Time” and “End Time” of your working hours. Start and End times can be entered in increments of 15 minutes. If you work overnight (beyond mid-night) then the system will auto detect it and display “yes” in the “Overnight” column. If you work overnight then your overnight work hours settings will take precedence over the next days settings until the “Stop Time” of your overnight hours. If you work in multiple timespans on any day, for example 9:00 AM to 1:00 PM and 2:00 PM to 6:00 PM, you can add “additional timespans” and enter those start and end times. In the picture below take note of the “Overnight Hours” of Wednesday and “Time-span 2” of Thursday. To add additional time-spans, please click on the “Add Timespan” icon in the “Actions” column.

Weekday Hours

Weekday Hours

Additional time-spans can be added through the screen opened up when the “Add Timespan” icon in the Actions column is clicked.

Add Time Span Screen

Add Time Span Screen

Please ensure that you submit all of your times before you try to add additional timespans.

To add a “Holiday” please enter the Holiday name and Date. Please note that holiday settings takes precedence over weekday settings. For example the holiday happens to be Friday, then the holiday work hours (or Closed All Hours) takes precedence over the Friday work hours. Holidays can be added upto one year in advance, for example in Year 2019 you can add all holidays of the reminder of the year 2019 and also for the full year 2020.

Holidays Add - Enter holiday name and date

Holidays Add – Enter holiday name and date

Please note that the newly added holiday is set to “Closed All Hours” by default and this setting comes into effect immediately. You can update the default setting as per your needs as soon as the holiday is added.

Holiday Added

Holiday Added

Similar to the Weekday hours, you can select “Closed All Day”, “Open All Day” or “Open during the given hours” option for the holidays. When the last option is selected, you can enter the Start and End times of your holiday work hours. If you work overnight on the holiday, overnight work hours can you entered. If you work in multiple timespans on the holiday you can enter such multiple time-spans. You can edit any holiday name and date except when the holiday is already passed.

You can manage VOIP Lines in your Work Hours group (Add VOIP Lines to the group, Remove VOIP Lines from the group, Move VOIP Lines across your groups) etc., by going to the “Manage VOIP Lines” page. You would need to do this when you have new persons added to your teams or people move across teams or take up other roles etc.,

Manage VOIP Lines in work hours group

Manage VOIP Lines in work hours group

Manage VOIP Lines page

Manage VOIP Lines page

To add new group, use the “Add New Group” icon in the top “Group and Timezone” section. Please refer to the picture below.

Add New Group Icon

Add New Group Icon

When you have more than one group added in your account, you can view the list of all of your groups. You can also see all of your VOIP Lines and the group of those VOIP Lines on this groups listing page. You will be able to move the VOIP Lines across your groups from this page. Please refer to the picture below to see the icon to access this page.

List All Groups

List All Groups

Groups And VOIP Lines List

Groups And VOIP Lines List

You can see the current time of the group, in the groups timezone and also the current status of the group like “Open” or “Closed” or “Default” and the exact reason for the status like “Monday Open 9:00 AM to 5:00 PM” or “Closed – Outside work hours” etc., If there is no data or no settings were saved for the current time you will see “Default” as the current status. For the “Default” current status – DoorVaani system default settings apply. In the default settings if the VOIP Line is in use when the inbound call comes in, the “busy” voicemail greetings message will be played and if you don’t answer the call, the “unavailable” voicemail greetings message will be played to the caller.

Current Time And Current Status

Current Time of the timezone And Current Status along with status reason

Install And Configure ZoiPer5 on Windows

This blog post helps you in installing ZoiPer5 on Windows and also configure it to work with your DoorVaani account. Please refer to the screen shots and follow the annotations made on those screen shots. If you don’t have a DoorVaani account yet, please register for free here to create one.

  1. To download ZoiPer5 please go to www.zoiper.com and click on the Download link and then select the free community version. Once download is completed, please double click on the downloaded .exe file to start the installation process. Once the installer opens click on ‘Next’ button on the introduction screen.

    ZoiPer Setup Wizard

    Click on Next in the ZoiPer setup wizard

  2. Accept the license agreement to complete the installation process.

    Accept the License Agreement

    Accept the License Agreement

  3. Select the components you wish to install.

    Select ZoiPer Components

    Select ZoiPer Components

  4. Select the installation directory.

    Installation Directory

    Installation Directory

  5. Select the name of the startup menu folder.

    Start Menu Folder

    Start Menu Folder

  6. Select your system architecture – 32 bit or 64 bit. ZoiPer suggests the auto detected architecture.

    Select Architecture

    Select Architecture

  7. Select installation type – for All Windows Users or the Current User. If your computer is having multiple windows users then selecting All Users will make ZoiPer available to all.

    Installation Type

    Installation Type

  8. Click on “Next” button on the “Ready to install” screen.

    Ready To Install

    Ready To Install

  9. Wait for the installation process to complete and then click on the “Finish” button.

    Finish Installation

    Finish Installation

  10. Launch ZoiPer if not already launched in your in your computer. Once ZoiPer is open, please click on “Continue as a Free User” link.

    Continue as a free user

    Continue as a free user

  11. Please enter your DoorVaani.com VOIP Line username and VOIP Line password. Please note that both VOIP Line username and password are case sensitive. If you do not know your VOIP Line username, you can see it in your DoorVaani.com account. If you forgot your VOIP Line password, you can reset it in your DoorVaani.com account. Please click on the login button after entering the username and password.

    VOIP Line username and password

    VOIP Line username and password

  12. Please enter your DoorVaani.com SIP Domain / Hostname. For most users this name will be as1.doorvaani.com

    SIP Hostname or SIP Domain

    SIP Hostname or SIP Domain

  13. Please skip the optional SIP Authorisation screen as this is not required.

    Skip Optional Authorisation

    Skip Optional Authorisation

  14. Please select SIP TCP or SIP UDP on the configurations screen and then click on Next button.

    Select SIP UDP or SIP TCP

    Select SIP UDP or SIP TCP

  15. Test your configurations by clicking on the configure button.

    Testing Configurations

    Testing Configurations

  16. After successful testing, please click on “Finish” to finish the ZoiPer configuration.

    ZoiPer Success

    ZoiPer Success

  17. Once the configuration is successfully finished you will see a “green tick” mark by the side of your account name in the top part of ZoiPer and you can then click on the “dialpad” icon to see the see the dialpad.

How to change your existing ZoiPer account configuration?

If you need to change your ZoiPer account configuration like change the VOIP Line username or password or change your SIP Domain name, please do the following:

  1. Click on ZoiPer “settings” gear wheel in the top right corner.

    Settings Gear Wheel

    Settings Gear Wheel

  2. In the settings menu on the left hand side, click on “Accounts”.

    ZoiPer Accounts menu

    ZoiPer Accounts menu

  3. Now click on your Account Name on the left hand side under SIP.

    ZoiPer Account Name

    ZoiPer Account Name

  4. Now you can edit your Domain Name, Username and Password shown on “SIP Credentials” page.

    Edit SIP Account Details

    Edit SIP Account Details

  5. After doing the desired updates, please click on your Account name on the left hand side and then click “yes” in the alert message that pops up to save your changed data.

    Save Account updates

    Save Account updates

  6. Close the accounts screen and the setting screen to go back to the ZoiPer dialpad.

IP Address Banned or Unbanned E-mails

If too many failures in registering your VOIP Line to DoorVaani server occur in a very short period of time, then, as a security measure, your IP Address will be banned from accessing our server for 20 minutes each time such an incident happens. The most common failures, that end up in banning your IP address, are of the following types:

1. Incorrect VOIP Line Password (Note: Password is case sensitive).
2. Auth Name mismatch with Username (Auth name must be either blank or exactly same as your VOIP Line username and is case sensitive).
3. Not registering your VOIP Line from the “Permitted IP or Range” as saved by you.
4. Registering the VOIP Line, which is not supposed to be registered, as it is set by you to send inbound calls to your Static IP.

If your IP Address is banned for any of the above reasons or for any other reason, you will be immediately notified by e-mail that includes what exactly the problem is and how to overcome it. Please pay attention to the contents of these e-mails as it will contain valuable information on how to overcome the problem that is causing this issue. Similarly when your IP Address gets automatically unbanned at the end of the 20 minutes interval, you will receive another e-mail informing you of this unban action. If you do not want to wait for 20 minutes for the IP Address to be unbanned, you can manually unban it immediately. Please refer to this blog article on how to manually Unban your IP address.

Regarding the e-mails that are sent out by our server, you can have the following two preferences:

1. Just in case you do not want to receive these E-mail alerts, you can unsubscribe from these e-mails.
2. If you want to receive these e-mail alerts on a different e-mail id, you can change the E-mail id in your DoorVaani account.

Please Note: Before you take any action, please ensure that the IP Address shown in the E-mail you received is really your IP Address. You can see what your IP Address is, by going to a service like www.WhatIsMyIP.com. If the banned IP address is not your IP Address, it indicates someone else is trying to misuse your account or steal your credit. Please contact us immediately if this is the case so that we can help you secure your account.

The rest of this blog post explains how to set up your e-mail preferences.

How to unsubscribe from these E-mail alerts?

1. Login into your DoorVaani account.
2. Go to “VOIP Line Details” page, by clicking on your VOIP Line username in the “My VOIP Lines” page.

Click on VOIP Line name

VOIP Line username

3. Locate the “Send IP Address Bannned/Unbanned emails:” section at the bottom of the “VOIP Line Details” page.

IP Address Ban/Unban Email preferences

IP Address Banned or Unbanned Email Preferences

4. Uncheck the “Send IP Address Banned/Unbanned emails” check box and submit the page.

How to change the E-mail ID for these alerts?
1. Login into your DoorVaani account.
2. Go to “VOIP Line Details” page, by clicking on your VOIP Line username in the “My VOIP Lines” page.
3. Locate the “Send IP Address Bannned/Unbanned emails:” section at the bottom of the “VOIP Line Details” page.
4. Check the check box, enter your desired E-mail ID in the input box labeled “Email ID for IP Address Banned/Unbanned” below the check box and submit the page. Please refer to the images above for the full details.

How to get your IP Address Unbanned and Make Our Server Accessible?

If too many failures in registering your VOIP Line to our server occur in a very short period of time, then, as a security measure, your IP Address will be banned from accessing our server for 20 minutes each time such an incident happens. The most common failures, that end up in banning your IP address, are of the following types:

1. Incorrect VOIP Line Password (Note: Password is case sensitive).
2. Auth Name mismatch with Username (Auth name must be either blank or exactly same as your VOIP Line username and is case sensitive).
3. Not registering your VOIP Line from the “Permitted IP or Range” as saved by you.
4. Registering the VOIP Line, which is not supposed to be registered, as it is set by you to send inbound calls to your Static IP.

If your IP Address is banned for any of the above reasons or for any other reason, you will be immediately notified by e-mail that includes what exactly the problem is and how to overcome it. Please pay attention to the contents of these e-mails as it will contain valuable information on how to overcome the problem that is causing this issue. Similarly when your IP Address gets automatically unbanned at the end of the 20 minutes interval, you will receive another e-mail informing you of this unban action. You may want to unsubscribe from these e-mail alerts or you may want to change the e-mail id for these alerts. Please refer to this blog article on how to unsubscribe or change E-mail id.

If you do not want to wait for 20 minutes for the IP Address to be automatically unbanned, you can manually unban it immediately. The rest of this blog post explains how to manually unban your IP Address.

Please Note: Before you take any action, please ensure that the IP Address shown in the E-mail you received is really your IP Address. You can see what your IP Address is, by going to a service like www.WhatIsMyIP.com. If the banned IP address is not your IP Address, it indicates someone else is trying to misuse your account or steal your credit. Please contact us immediately if this is the case so that we can help you secure your account.

How to manually unban your IP Address?

1. Login into your DoorVaani account.
2. Go to “VOIP Line Details” page, by clicking on your VOIP Line username in the “My VOIP Lines” page.

Click on VOIP Line name

VOIP Line username

3. In the top of the “VOIP Line Details” page, you can see your VOIP Status showing you the IP address status. You will also see a link “Please click here to unban this IP now”. Please click on this link and your IP Address will be unbanned and access to our server will be opened.

IP Address Unban Link

IP Address Unban Link

IP Address Unban Confirm

IP Address Unban Confirm

Please Note: You must correct the problem that caused the IP address ban before you manually unban your IP address. Unless you correct the problem your IP address will get banned again.

How to set IP address for Inbound Calls with IP Authentication?

In your DoorVaani account, you can set your static IP address on which you want to receive inbound calls destined to your VOIP Line. This is known as IP Authentication. If you are using IP Authentication, you are not supposed to register your VOIP Line to our server.

How to set IP Authentication (Static IP Address for inbound calls)?

1. Login into your DoorVaani account.
2. In your VOIP Lines page, please click on your VOIP Line username to be taken to the “VOIP Line Details” page.

Click on VOIP Line name

VOIP Line username

3. Locate the “Send incoming calls to static IP” check box and input box in “VOIP Line Details” page and check the box ON and enter your static IP on which you want to receive your inbound calls.

Static IP for Inbound Calls

Set static IP to received inbound calls.

4. Submit the page to save your updates.

How to remove IP Authentication?

If you want to remove IP Authentication, please revisit this page and uncheck the check-box and remove the IP address and save this page with a blank in this field.

How to set Permitted IP or Range for your VOIP Line?

You can protect your DoorVaani VOIP Line from misuse by setting it to be registered only from your static IP or a range of static IP addresses written in CIDR Notation. Once a “Permitted IP / Range” is set for a VOIP Line it can be registered only from that IP address or that range of IP addresses.

How to set permitted IP / Range?

1. Login into your DoorVaani account.
2. In your VOIP Lines page, please click on your VOIP Line username to be taken to the “VOIP Line Details” page.

Click on VOIP Line name

VOIP Line username

3. Locate the “Permitted IP or Range(CIDR Notation)” input box in the top of the “VOIP Line Details” page and enter your static IP or Range of IP addresses in CIDR Notation.

Permitted IP or Range

Enter your Static IP or Range of IPs in CIDR

4. Submit the page to save your updates.

How to unset permitted IP / Range?

If you want your VOIP Line to be registered from any IP Address, please revisit this page and remove the Permitted IP address / Range and save this page with a blank in this field.

Install And Configure ZoiPer5 on Mac OSX

This blog post helps you in installing ZoiPer5 on Mac OSX and also configure it to work with your DoorVaani account. Please refer to the screen shots and follow the annotations made on those screen shots. If you don’t have a DoorVaani account yet, please register for free here to create one.

  1. To download ZoiPer5 please go to www.zoiper.com and click on the Download link and then select the free community version. Once download is completed, please click on the downloaded .pkg file to start the installation process. Once the installer opens click on ‘Continue’ button on the introduction screen.

    Installer Introduction screen

    Installer Introduction Screen Click on Continue

  2. Please click on ‘Continue’ after selecting the hard disk on which you want to install ZoiPer5.2InstallerDestinationSelectContinue
  3. Click on ‘Install’ button to do the standard installation.3InstallerInstallationType
  4. Enter your Mac admin username and password and click on Install Software.4Installer_Mac_Username_Password
  5. Allow the installation to complete and finally you will see the installation success screen. Now you can close the installer by clicking on the close button.5InstallerSummary
  6. Once the installation is complete you may either keep the downloaded package or Move it to Trash.6InstallerPackageTrashOrKeep
  7. Now go to your Mac Applications folder and double click on ZoiPer5 to open it. Once the ZoiPer is open please click on “Continue as a Free User”.Configure1ContineAsFreeUser
  8. Now enter your DoorVaani VOIP Line username and password and click on ‘Login’. Please note that both VOIP Line username and password are case sensitive. If you do not have DoorVaani VOIP Line username and password you can create one for yourself. Please click here to learn how to create a VOIP Line username and password. If you forgot your VOIP Line password you can reset it.Configure2EnterLoginCredentials
  9. Please enter the SIP Hostname: as1.doorvaani.com and click on the Next button. Please ensure that you spell the hostname correctly.Configure3EnterSIPHostAndNext
  10. Skip the optional Authentication and Outbound proxy entry screen.Configure4OptionalAuthOutProxySkip
  11. Please select SIP UDP and click on skip. You can select this SIP UDP option even if the configuration screen shows it as ‘untested’.Configure5SelectSIPUDPAndSkip
  12. Please click on “Yes” to the Warning message.Configure6YesToSkipManualConfigWarning
  13. You can select default account name or change the name to anything of your choice. Select the protocol as SIP and then click on Create Account button.Configure7AcctNameProtocol
  14. Your account will be created and shown to you on the Accounts screen. You should see a green tick mark by the side of your account as soon as it successfully registers to our SIP Server. You can close the Accounts screen by clicking the X as shown in the picture below.Configure8AcctCreatedCloseX
  15. You should now see your ZoiPer5 running on your computer. If you need to change anything in your account configuration, please click on the settings gear wheel and then select the account to see the configuration details. You can edit these details like your VOIP Line username, password, SIP Hostname and Account name on the Account Settings screen. To start dialing out numbers, please click on the dialpad icon and enter the full number starting from the country code.
    Configure10ZoiperRunning
  16. The next time you open ZoiPer you should click again on “Continue As a Free User” link.Configure9ContinueAsAFreeUser
  17. You must keep your ZoiPer always running on your computer to receive inbound calls. You can minimize it to tray but should keep it always running.

Best Match Caller ID – Dynamically assigned based on the called phone number

The challenge of achieving higher call answer rates on your outbound campaigns is faced by most of the tele marketers. The most important piece of information your call recipients are looking at while your call rings on their end is your Caller ID. Projecting a local presence through your Caller ID to your call recipients helps a lot here as they are more inclined to take local calls and calls from their own region. DoorVaani’s “Best Match Caller ID” comes to your help here.

What is Best Match Caller ID?

Best Match Caller ID is a set of caller ID numbers chosen by you from your DoorVaani Account’s DID Numbers, Toll-free numbers and Verified Numbers. You can have either all or some of your DID, Toll-free and Verified Numbers in this “Best Match Caller ID” set as per your needs. Best Match Caller ID set is VOIP Line specific so if you have multiple VOIP Lines in your account each one of your VOIP Lines can have its own Best Match Caller ID set.

How it works?

You just dial the phone number and our system analyses it in realtime and automatically picks one of your DID/Toll-free/Verified Numbers nearest to the called destination city/area code/country/region and sends it as your Caller ID.

For example if you dial a New York USA 1-917 number and if you have a 1-917 number in your DoorVaani Best Match Caller ID set then that 1-917 number will be dynamically set as your caller ID for that call. On the next call if you Dial a Toronto Canada Number and you have a Toronto Canada number in your DoorVaani Best Match Caller ID set then that Toronto Canada number will be dynamically set as your caller ID for that call. If you don’t have any number that matches with the country and city code that was called, then any other number from your Best Match Caller ID set that belongs to the called country will be set as your caller ID for that call. If no Number of the called country is in your Best Match Called ID set, then any other number in the same region will be set as your caller ID for that call. If the system finds more than one number that qualifies as your Best Match Caller ID then one of those numbers is randomly selected and used as your Caller ID.

How to set-up Best Match Caller ID?

After you login into your DoorVaani account, please click on the link in the “Caller ID” column of your VOIP Lines listing page. This link could say “Setup” or “Best Match” or show the DID/Toll-free number already setup by you. This takes you to the Caller ID Setup page of the VOIP Line you clicked on. If you have multiple VOIP Lines in your account, you will be able to set the Caller ID on each one of them separately.

My VOIP Lines Page Caller ID Setup Link

My VOIP Lines Page Caller ID Setup Link

On the Caller ID Set up page you will see the following three options to choose from:

Option 1. DID Numbers – This allows you to pick one of the DID or Toll-free numbers that are in your account as your Caller ID.
Option 2. Verified Numbers – This allows you to pick one of your Verified Numbers as your Caller ID.
Option 3. Best Match to Called Number – You can select one or more of your DID Numbers, Toll-free numbers and Verified Numbers, to include in the set of numbers from which to dynamically pick a best match to the outbound number as your Caller ID. When you buy more DID or Toll-free numbers or get more numbers verified in your account, please revisit this page and add those new numbers into the Best Match Caller ID set if you so desire.

Caller ID Set Up Page with Best Match Caller ID Option

Caller ID Setup page with Best Match Caller ID Option selected

Best Match Caller ID Tester:

When you select the ‘Best Match to Called Number’ option you will have access to a ‘Caller ID Tester’. You can see the Caller ID that would have been used on your outbound call to the number entered in this tester without you making any real outbound call. This Caller ID Tester helps you understand how the Best Match Caller ID works without the need of making any real outbound calls.

Best Match Caller ID Tester

Best Match Caller ID Tester

Note: The actual Caller ID that was sent out on your outbound calls can be seen by you in your call detail records.