Outside of your working hours, you may want your callers to leave you voicemail messages directly without ringing your devices. In your DoorVaani account, you can enter your annual holidays and whether or not you work on those holidays. You can specify your Sunday to Saturday weekday work hours as well as your holidays work hours if any. Any inbound calls that comes to you outside of the working hours set by you will land straight into your voicemail. To access this page, please click on “MY DASHBOARD > Weekdays/Holidays Hours” menu from the left hand side as shown in the figure below.
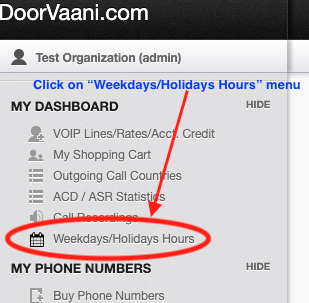
Weekdays/Holidays Hours Menu
Please ensure that you have one or more VOIP Lines created in your account before you try to setup your Weekdays/Holidays hours. If you do not have any VOIP Lines created in your account, you will see a page asking you to create a VOIP Line.

No VOIP Line Found page
If you have multiple VOIP Lines in your account, you can create “groups” of your VOIP Lines, and have the Weekdays/Holidays hours set up by you applicable to all those VOIP Lines in the group. If you have only one VOIP Line, a group of just one VOIP Line is auto created by the system for you. You can also select a Timezone and then enter all of your hours in the selected timezone. Enter any group name of your choice for your easy identification of groups. DoorVaani system auto suggests the group name based on the timezone you select which can be changed by you.

Auto Group of only one VOIP Line
Please select the timezone in which the group works. If you have multiple teams each working in a different timezone then you can create as many groups as the teams you have and then select the timezone for each one of your groups. Once you select a timezone, the current time of the selected timezone will be shown to you. Ensure that you submit your selections to save your group/timezone information.
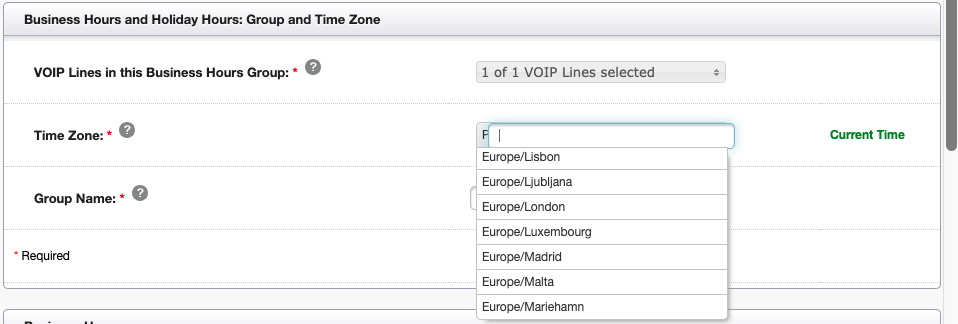
Select A Time Zone
In the “Weekday Hours” and “Holiday Hours” sections, you can choose one of the three options for the work hours: 1. Closed All Hours, 2. Open All Hours and 3. Open during given hours as applicable to you. If you select the 3rd option “Open during given hours” you can enter your “Start Time” and “End Time” of your working hours. Start and End times can be entered in increments of 15 minutes. If you work overnight (beyond mid-night) then the system will auto detect it and display “yes” in the “Overnight” column. If you work overnight then your overnight work hours settings will take precedence over the next days settings until the “Stop Time” of your overnight hours. If you work in multiple timespans on any day, for example 9:00 AM to 1:00 PM and 2:00 PM to 6:00 PM, you can add “additional timespans” and enter those start and end times. In the picture below take note of the “Overnight Hours” of Wednesday and “Time-span 2” of Thursday. To add additional time-spans, please click on the “Add Timespan” icon in the “Actions” column.
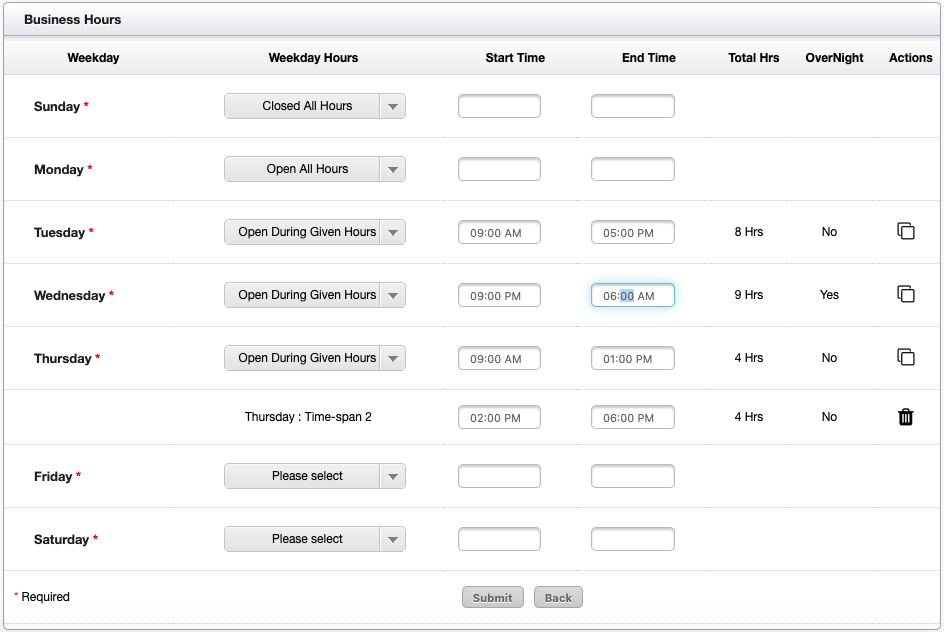
Weekday Hours
Additional time-spans can be added through the screen opened up when the “Add Timespan” icon in the Actions column is clicked.
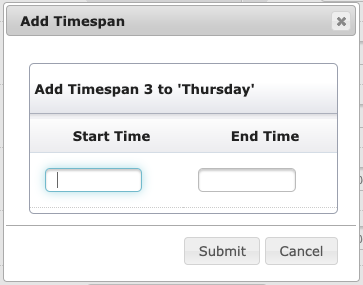
Add Time Span Screen
Please ensure that you submit all of your times before you try to add additional timespans.
To add a “Holiday” please enter the Holiday name and Date. Please note that holiday settings takes precedence over weekday settings. For example the holiday happens to be Friday, then the holiday work hours (or Closed All Hours) takes precedence over the Friday work hours. Holidays can be added upto one year in advance, for example in Year 2019 you can add all holidays of the reminder of the year 2019 and also for the full year 2020.

Holidays Add – Enter holiday name and date
Please note that the newly added holiday is set to “Closed All Hours” by default and this setting comes into effect immediately. You can update the default setting as per your needs as soon as the holiday is added.

Holiday Added
Similar to the Weekday hours, you can select “Closed All Day”, “Open All Day” or “Open during the given hours” option for the holidays. When the last option is selected, you can enter the Start and End times of your holiday work hours. If you work overnight on the holiday, overnight work hours can you entered. If you work in multiple timespans on the holiday you can enter such multiple time-spans. You can edit any holiday name and date except when the holiday is already passed.
You can manage VOIP Lines in your Work Hours group (Add VOIP Lines to the group, Remove VOIP Lines from the group, Move VOIP Lines across your groups) etc., by going to the “Manage VOIP Lines” page. You would need to do this when you have new persons added to your teams or people move across teams or take up other roles etc.,

Manage VOIP Lines in work hours group
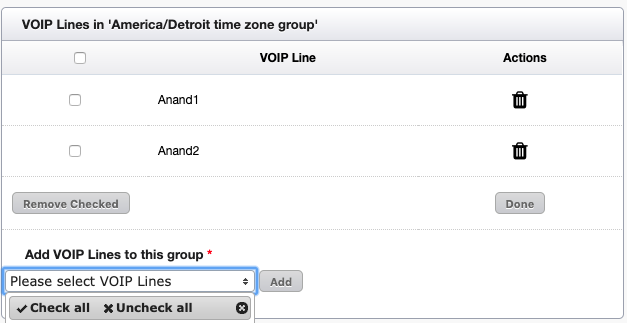
Manage VOIP Lines page
To add new group, use the “Add New Group” icon in the top “Group and Timezone” section. Please refer to the picture below.
Add New Group Icon
When you have more than one group added in your account, you can view the list of all of your groups. You can also see all of your VOIP Lines and the group of those VOIP Lines on this groups listing page. You will be able to move the VOIP Lines across your groups from this page. Please refer to the picture below to see the icon to access this page.

List All Groups
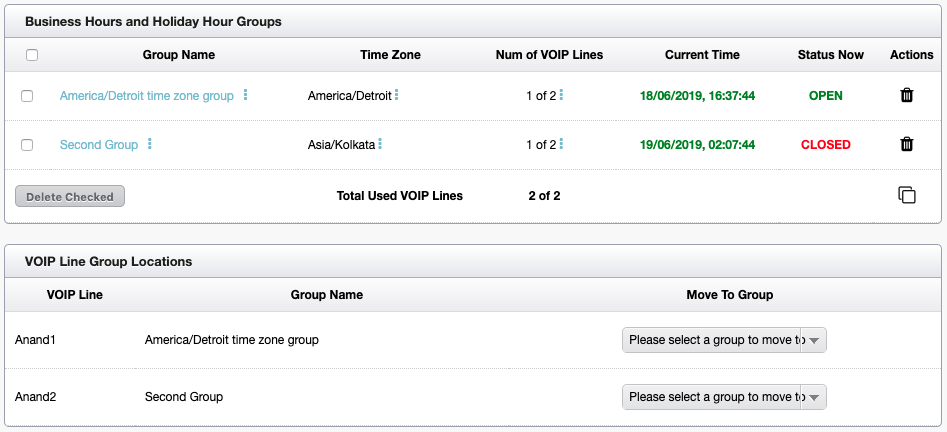
Groups And VOIP Lines List
You can see the current time of the group, in the groups timezone and also the current status of the group like “Open” or “Closed” or “Default” and the exact reason for the status like “Monday Open 9:00 AM to 5:00 PM” or “Closed – Outside work hours” etc., If there is no data or no settings were saved for the current time you will see “Default” as the current status. For the “Default” current status – DoorVaani system default settings apply. In the default settings if the VOIP Line is in use when the inbound call comes in, the “busy” voicemail greetings message will be played and if you don’t answer the call, the “unavailable” voicemail greetings message will be played to the caller.

Current Time of the timezone And Current Status along with status reason